How I Read Research Papers with Obsidian and Zotero
On this page
Updates:
- 2024-07-05: I’ve updated the script with new features: annotation sorting by page, date, or index in ascending/descending order; import select now finds all papers with pagination; real-time progress indicator with step-by-step status; more metadata fields accessible with
{{VALUE:key}}. - 2023-03-12: Zotero v6 broke the previous workflow. On 2023-03-12, I updated this article with my new workflow. Previously, the Citations plugin was used to import the paper into Obsidian. Now, I use QuickAdd to do the same thing.
How do we manage the complexity and depth from research papers in our note systems? How do we minimize the friction of taking notes in a PDF document and turning those into evergreen, permanent notes?
Those were the exact questions I was asking myself a few days ago. Reading research papers was a mess. I had no good way to import my highlighted notes to my note system, and the only good way didn’t do everything I needed it to.
So I created my own system for reading research papers; a combination of Zotero (opens in a new tab) and Obsidian (opens in a new tab). Let me show you what I made, and how it can help you.
Process outline
- Add paper to Zotero inbox
- Read the paper when I have time, and take notes
- Automatically ingest it into Obsidian with the desired template and metadata
- Processing the notes; thinking through the ideas and turning them into separate notes if desired
In this article, I’ll show you 1-3.
Let’s get to it.
Setting up Zotero
The process always starts with me adding a paper to my Zotero inbox. Learn how to maintain your Inbox and keep it clutter-free. (opens in a new tab)
I use the Zotero Connector (opens in a new tab) extension to save papers directly to Zotero from my browser. You can also use the magic wand button in Zotero to add papers by their DOI.
To read the papers, I use the new built-in PDF reader for Zotero; a powerful PDF reader & annotation tool.
As I read, I simply annotate the passages that I find relevant. This includes asking questions regarding the presented information, summarizing, comparing to other literature, or explaining things in my own words.
Setting up Obsidian
To enable the workflow on Obsidian, you’ll need the QuickAdd (opens in a new tab) plugin. You can find the plugin in Obsidian’s plugin store.
I also recommend checking out my video on how the plugin works (opens in a new tab).
As an aside, there exist other good plugins that can help you import into Obsidian. Some of them are unfortunately outdated and no longer maintained.
The best alternative I have found is the Zotero Integration (opens in a new tab) plugin by the great Matthew Meyers. It is very powerful, and has a ton of great features, but also has some weaknesses that I think this workflow addresses. For example, it does not work on mobile.
The method I present here works on any device. The only requirement is that you use Zotero’s Sync feature, such that your data is synchronized to the Zotero online database. This is where the script will pull the data from.
Now, let’s set up the template used for paper notes.
My research paper template
The following is the template I use for papers. I use Dataview (opens in a new tab), so my metadata looks a bit different from the conventional YAML.
You’ll want to save the template in your vault, and then use the Template Path setting in QuickAdd to point to it. More on that in a moment.
---
tags: in/paper state/process
aliases:
    - '{{VALUE:title}}'
cssclass: null
abstract: >
    {{VALUE:abstract}}
---

# {{VALUE:title}}

---

Type:: [[&]]
Title:: {{VALUE:title}}
Author:: {{VALUE:authors}}
Year:: {{VALUE:date}}
Tags::
DOI:: {{VALUE:doi}}
Reviewed Date:: ==UPDATE THIS==
Rating:: ==Give a rating==

---

## Abstract

{{VALUE:abstract}}

## Summary of key points

-

## Other Comments

-

## Interesting Cited References

-

---

{{VALUE:formattedAnnotations}}
You’ll notice a bunch of {{VALUE:key}} placeholders in the template. These are the properties that will be filled out by QuickAdd, based on the metadata of the paper and annotations.
The ReviewedDate property will link to my daily note. I update this manually when I’m done reviewing the paper.
The remaining properties contain information about the paper itself.
What makes the script powerful is that it allows you to customize both the template & how annotations and authors are formatted to your liking. I’ll show you how in a moment.
Setting up QuickAdd
We’ll need to install a QuickAdd user script for this to work. The video I mentioned earlier shows you how to do so here (opens in a new tab). You can grab the Zotero Importer script here (opens in a new tab).
You will need to copy the script contents into your Obsidian vault as a new file. The file should be named zotero.js. You will need to do this outside of Obsidian, e.g. by copying the text, pasting it into a notepad, and then saving it as zotero.js in your Obsidian vault.
QuickAdd’s macros allow you to run multiple actions with a single command. In this case, we use a macro to:
- Trigger the Zotero Importer script to fetch paper metadata and annotations from Zotero
- Use a Template action to create a new note in Obsidian with the fetched data
This makes importing research papers into Obsidian quick and easy. With just one click, you can create a fully formatted note with all the paper’s details and your annotations.
At this point, we need to create a macro, if you haven’t already. In QuickAdd, go to Manage Macros, and add a new macro. Once the macro has been added, go ahead and click Configure.
First, you’ll want to add the user script to the macro. I called it zotero.js, so that’s what I’m adding.
To use the script, you need to generate an API key for Zotero. You can do so here (opens in a new tab). Generate one by clicking Create new private key and then giving it library and notes access. Once you have the key, add it to the script by clicking the ⚙️ button next to it. You also need your Zotero user ID, which you can find on the same page as the API keys.
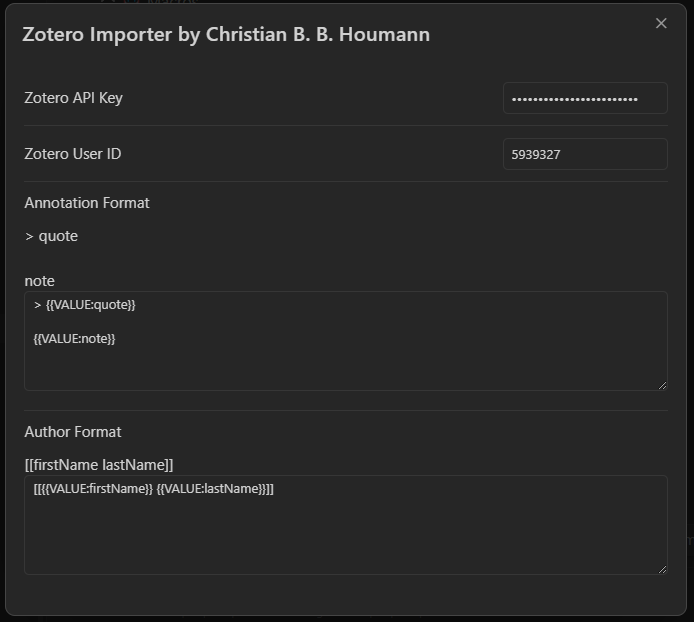
This settings panel is also where you customize how annotations and authors are formatted.
The settings shown above are a great start, but you can customize them to your liking.
I’ll show you my settings at the end of this section, which you can use as inspiration.
The settings are important as they determine how the script formats the data.
{{VALUE:formattedAnnotations}} is what will be used to import the annotations into the note and {{VALUE:authors}} to import the authors into the note, given the settings you set here.
You can sort annotations by page, modified date, added date, or sort index.
I recommend using the sort index in ascending order, as it seems to be the closest to the order of the annotations in the PDF.
Now add a Template to the macro by clicking the Template button. My Template Choice looks like this:
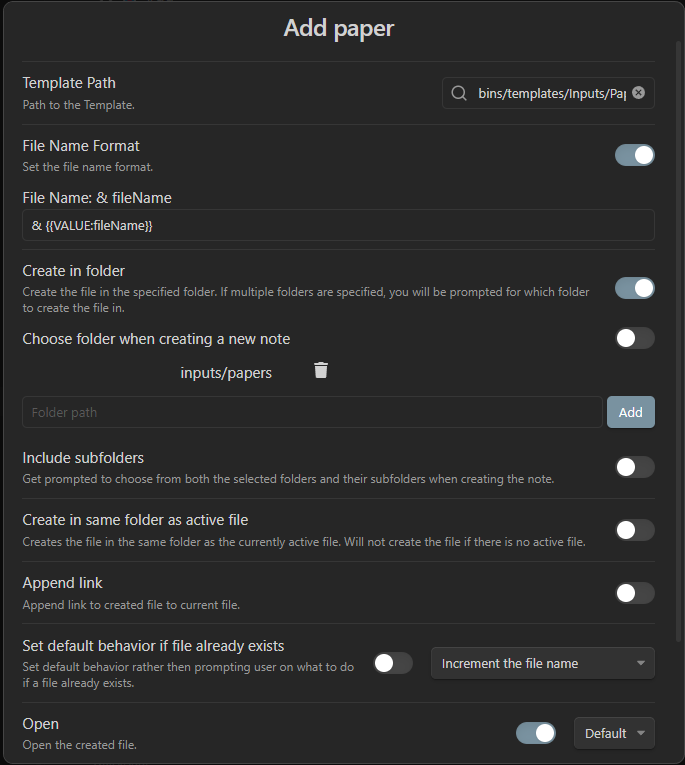
Here’s an explanation of the settings:
- Template Path is the path to my template. This is the path to the note that you’ve created from the template I shared above. Your will vary from mine, unless you have the exact same naming and folder structure.
- File Name Format is the format of my file names. I use
&in front of papers for my file convention. The{{VALUE:fileName}}is necessary, as it grabs the paper’s title and uses that, which happens through the script. - I use create in folder because I put my source notes in an inputs folder.
- And lastly, open. This is used to open the created file.
This is what your macro should look like.
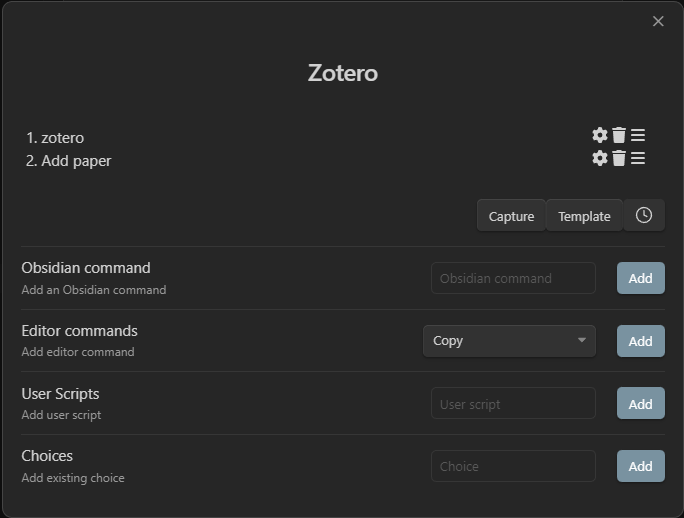
Having created the macro, all you need is a QuickAdd choice to activate it. Back in the main QuickAdd menu, add a Choice of the Macro type, naming it 📜 Add Paper (or whatever you like). Click ⚙ settings for it and select your newly created macro.
My settings
Annotation format
- If the annotation is an image (via the new Zotero PDF annotator), it’ll indicate so. Images are not yet supported by the Zotero API, so I use this to indicate that I should go and manually copy it in. I just right-click to copy the image in Zotero and then paste it into Obsidian.
- If the note includes
.hX, whereXis the heading level (like.h1for a level 1 heading), it will generate# <quote>. This helps track the paper’s structure. Mark each heading in the paper with.h1,.h2, etc., and the script will format it neatly for you. - If the quote starts with a hashtag, we assume it’s a tag, and we just return that.
- Otherwise, do markdown block quotes for the highlighted text and with the note below the quote.
```js quickadd
const note = this.variables.note;
let quote = this.variables.quote;

if (this.variables.annotationType === "image") {
    return "==Images not supported yet.=="
}

const headingMatch = note.match(/\.h(\d+)/);

if (headingMatch) {
    const headingLevel = Number.parseInt(headingMatch[1], 10) + 2;
    const hashtags = '#'.repeat(headingLevel);
    quote = `${hashtags} ${quote}`;
}

if (quote.trim().startsWith("#")) return quote;
return `> ${quote}`
```

{{VALUE:note}}
Sorting
I’m using ascending sort-index in ascending order, which works well for me.
I highly recommend using this, as it seems to be the best sorting option.
Creating notes in Obsidian from papers in Zotero
Now that we’re all set up, it’s time to use the script!
Having read a paper, I’ll go into Obsidian and activate the 📜 Add Paper choice. A menu like this will open:

Selecting a paper will create a new note, which looks like this:
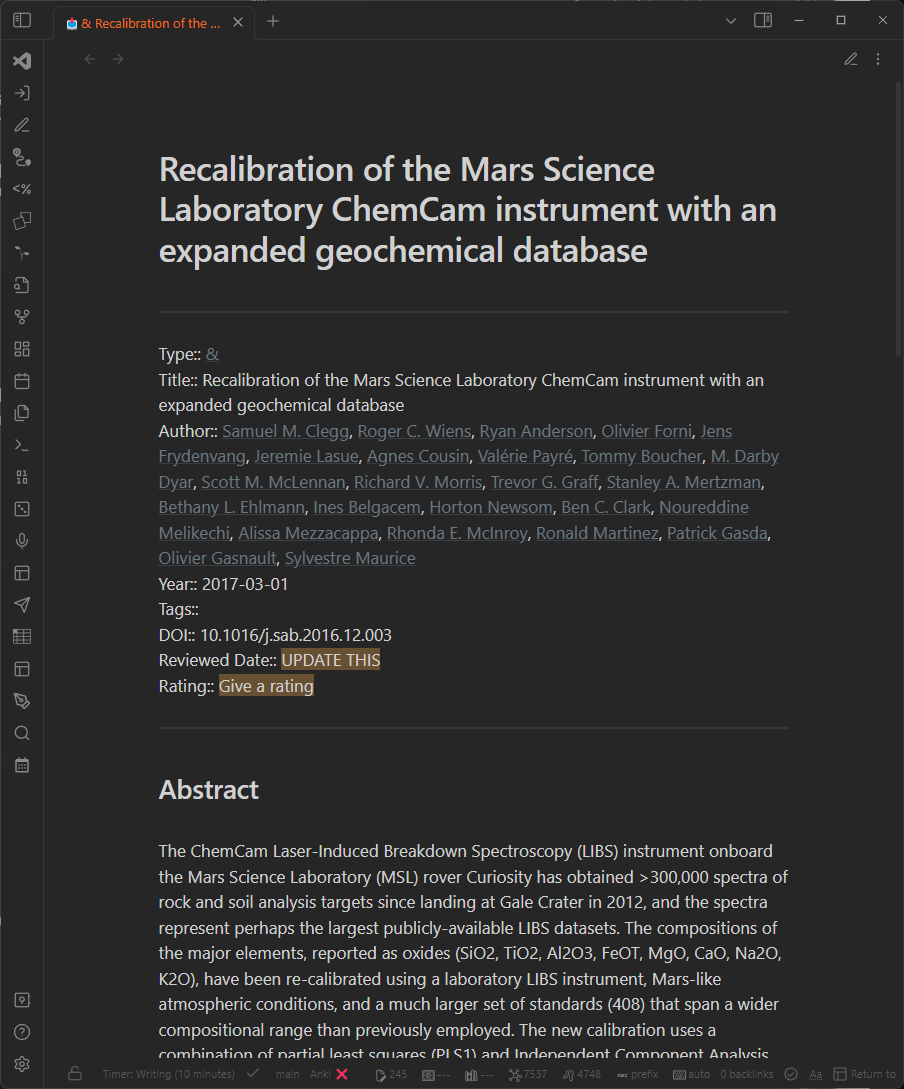
So there it is. This is how I import papers into my vault; notes, metadata, and all.
How you can use it
Any of the following variables can be accessed with {{VALUE:variable}}, where variable is the name of the variable.
These can be used in your Template Choice settings (file name, etc.) as well as your markdown template.
General Item Metadata
- File Name:
{{VALUE:fileName}}. Paper title with all the special, illegal characters removed. - Author:
{{VALUE:author}}. All authors in the format you defined. You can use any of the variables here, exceptformattedAnnotationsandauthorto define the format. - Formatted Annotations:
{{VALUE:formattedAnnotations}}. All annotations in the format you defined. You can use any of the variables here, exceptformattedAnnotationsandauthorto define the format. - Item Key:
{{VALUE:key}} - Version:
{{VALUE:version}} - Parent Item Key:
{{VALUE:parentItem}} - Item Type:
{{VALUE:itemType}} - Date Added:
{{VALUE:dateAdded}} - Date Modified:
{{VALUE:dateModified}} - Title:
{{VALUE:title}} - Abstract Note:
{{VALUE:abstractNote}} - Publication Title:
{{VALUE:publicationTitle}} - Volume:
{{VALUE:volume}} - Issue:
{{VALUE:issue}} - Pages:
{{VALUE:pages}} - Publication Date:
{{VALUE:date}} - Series:
{{VALUE:series}} - Series Title:
{{VALUE:seriesTitle}} - Series Text:
{{VALUE:seriesText}} - Journal Abbreviation:
{{VALUE:journalAbbreviation}} - Language:
{{VALUE:language}} - DOI:
{{VALUE:DOI}} - ISSN:
{{VALUE:ISSN}} - Short Title:
{{VALUE:shortTitle}} - URL:
{{VALUE:url}} - Access Date:
{{VALUE:accessDate}} - Archive:
{{VALUE:archive}} - Archive Location:
{{VALUE:archiveLocation}} - Library Catalog:
{{VALUE:libraryCatalog}} - Call Number:
{{VALUE:callNumber}} - Rights:
{{VALUE:rights}} - Extra:
{{VALUE:extra}} - Creator Summary:
{{VALUE:creatorSummary}} - Parsed Date:
{{VALUE:parsedDate}} - Number of Children:
{{VALUE:numChildren}} - Abstract:
{{VALUE:abstract}} - Short Author:
{{VALUE:shortAuthor}} - DOI (lowercase):
{{VALUE:doi}} - Year:
{{VALUE:year}} - ISSN (lowercase):
{{VALUE:issn}}
Annotation Metadata
- Annotation Type:
{{VALUE:annotationType}} - Annotation Comment:
{{VALUE:annotationComment}} - Annotation Color:
{{VALUE:annotationColor}} - Annotation Page Label:
{{VALUE:annotationPageLabel}} - Annotation Sort Index:
{{VALUE:annotationSortIndex}} - Annotation Position:
{{VALUE:annotationPosition}} - Color:
{{VALUE:color}}
Notes and Quotes
- Note:
{{VALUE:note}} - Quote:
{{VALUE:quote}}
I hope you enjoy the workflow!
Any questions, requests, or otherwise? Feel free to reach out on Twitter (opens in a new tab) or elsewhere.
Sign up for my newsletter below 👇 to get updates and be the first to hear when I release new posts like this.