How I Write My Newsletter With Obsidian
On this page
How do I keep an overview of everything to include in my weekly newsletter?
This is the question I asked myself when I started building this system.
I needed a system for frictionless and easy management of my newsletter.
More specifically, I needed
- to remember every piece of content I want to include
- get an overview of notes or thoughts I’ve had recently that I could write about
- keep track of things I’ve already shared, so I don’t share the same stuff over and over
And that’s what I got.
It all starts on the Newsletter Dashboard.
The Dashboard
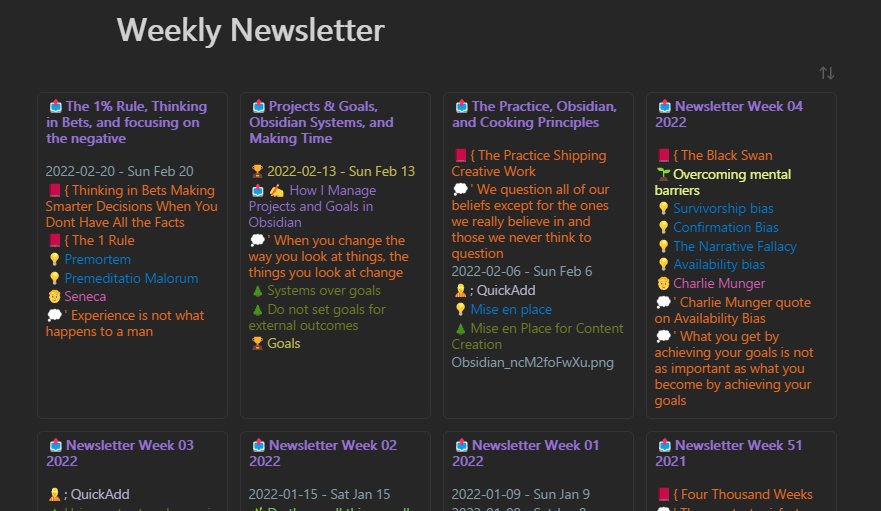
This is where I can see all previous editions of my newsletter.
It’s also where I can see the exact topics I’ve talked about in each of them.
The dashboard uses the Minimal theme (opens in a new tab) for Obsidian, as well as the Dataview plugin (opens in a new tab) for Obsidian. Both can be installed from within Obsidian.
For the cards view to work properly, you’ll need the Contextual Typography plugin (opens in a new tab) as well.
This is the entire note:
---
cssClasses: cards table-wide
alias: Newsletter
---

# Weekly Newsletter

```dataview
TABLE WITHOUT ID
	(link(file.path, title)) as Newsletter,
	file.outlinks as Links
FROM #out/newsletter AND !"bins/templates"
SORT file.ctime DESC
```
Let me explain.
At the top, between the ’---’ lines, I define the CSS classes I want to use for the cards. cards is necessary to display the Dataview table as cards. table-wide makes the table wider than the note is, which I like for the looks. I also define an alias for the note—for personal preference and searchability.
Then, the Dataview query. This query searches for all notes that have the out/newsletter tag, and also excludes notes that are in the “bins/templates” folder. This is to include all my newsletter notes, except the template note. This is just how I’ve built my vault. All content I create is nested under the out tag, whether it’s out/newsletter, out/video, out/article, or out/tweet.
I sort by the creation time of the note, so that the most recent notes are shown first.
file.link as Newsletter is so we link to the newsletter note in the card. file.outlinks as Links is so we link to the links going out from the note in the card—this is how I keep track of what I’ve already shared.
The newsletter notes
Each of my newsletter notes are created from the same template. To facilitate this, I use my plugin, QuickAdd (opens in a new tab), to create a note from the template. I also use this plugin to capture the links I want to include in the newsletter—but we’re getting ahead of ourselves.
This is the template I use.
---
tags: out/newsletter
aliases:
  - null
cssclass: null
---

- [ ] Sort captured
- [ ] Write newsletter
- [ ] Proof read
- [ ] Edit subject to match content and date
- [ ] Send test email to self and check through

## Metadata

Title::
Publish Date::

# Captured

### Notes created this week

```dataview
list
WHERE file.ctime > date(today) - dur(7 days) AND !contains(file.path, "bin")
```

## Mentioned

# Newsletter Week {{DATE:ww yyyy}}

## What I've made for you

## Other content...

## Quote
At the top, you see that I have a checklist for the steps I take before sending the newsletter.
I think checklists are very important when creating stuff you’re sharing publicly. They help ensure a certain quality.
The metadata fields are quite recent, as you can see in the dashboard image (3 weeks or so). I use it to keep track of the date the newsletter was sent, as well as the subject line for the newsletter. The subject is displayed on the dashboard, which makes it a bit easier to keep track of things. I usually make the subject after writing the newsletter, which is why it’s not the title of the note.
A quite useful feature is the “Notes created this week” Dataview query. This query lists all notes that were created in the last 7 days. This is a useful way to keep track of what I’ve been working on, so I can get more inspiration for what I could include in the newsletter. I work on a lot of different things in a given week, which is why I wanted this overview, so I’m sure I don’t miss anything.
Of course, I also have the # Mentioned heading. Under there, I make a list where I link to all the notes that I’ve included or written about in the newsletter. This is what helps show the list of things I’ve mentioned in the newsletter.
Below that heading is the general format for my newsletter. I write out the draft there, enter the Obsidian Reading view, and then I can copy the content from Obsidian into my mailing service. It retains formatting when done that way.
Creating the newsletter notes
I create the newsletter notes with QuickAdd.
I have an entire video dedicated to showing you how to use QuickAdd (opens in a new tab), so I won’t go into the details here—just the basics of my setup and how it works.
There’s two ways I can create the newsletter note. I can either create it with my QuickAdd Template choice, or the capture choice I’ll describe below.
First, the Template choice. This is what I use when I don’t have anything captured to the note yet (very rare), but I still need to create the note. You don’t need to create the note before capturing it (I’ll show this in a moment).
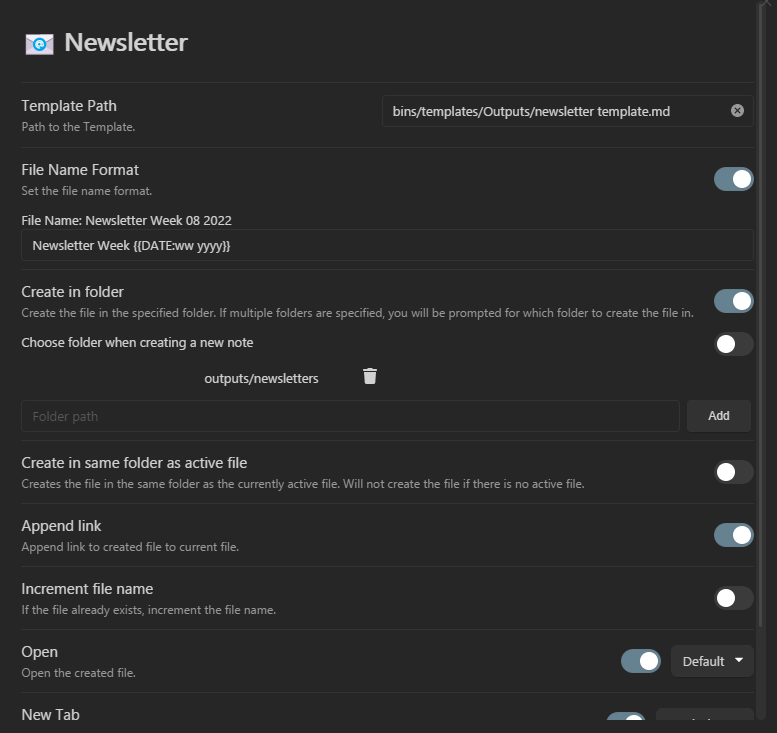
As can be seen in the image, I have a QuickAdd Template choice that
- creates the note with the template mentioned earlier
- gives the note a file name of the format “Newsletter Week {{DATE:ww yyyy}}”, which becomes “Newsletter Week 08 2022”, for example
- creates the note in the “outputs/newsletters” folder
- appends a link to the note in the currently open file
- and then, it opens the newly created newsletter note.
Yeah. I don’t want to do that manually every time I want to write my newsletter. I’d rather focus on actually writing it.
But! I actually usually create the note by… capturing to it?
Capturing to the newsletter notes
When I’m writing notes in my vault, I often think of something in the current note I really want to include in the newsletter. So I capture it to the newsletter note.
My setup is shown in the GIF below. I use the QuickAdd Capture feature to capture the currently open note to my newsletter, under the “Captured” section.
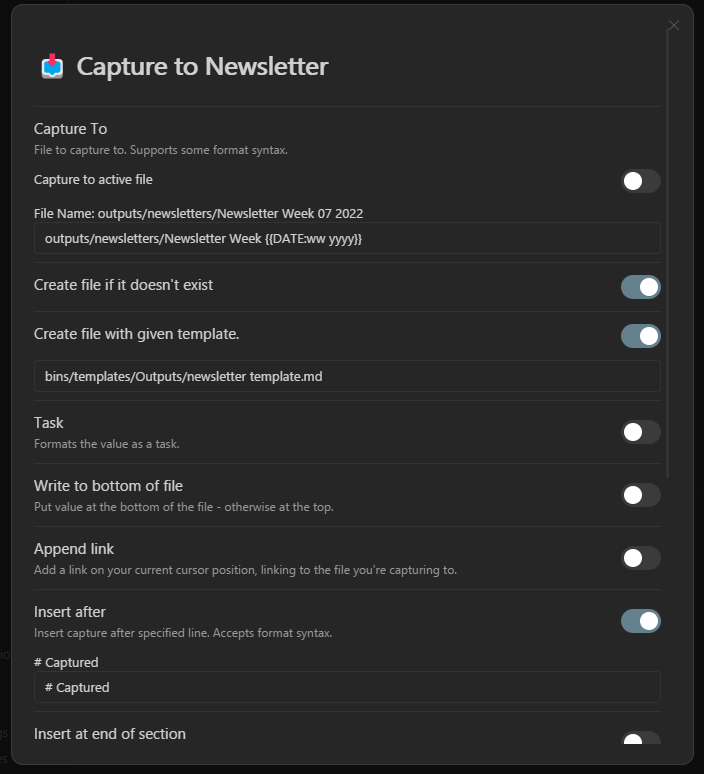
I capture to the file of the format outputs/newsletters/Newsletter Week \{\{DATE:ww yyyy}}, which is the path for to the latest newsletter note. If this note doesn’t exist, it’ll be created with the template I showed earlier.
I send the captured text to under the # Captured heading. I always capture in this format:
- {{LINKCURRENT}} {{VALUE:Comments?}}Notice the extra linebreak at the end. This ensures that the list remains a list (rather than having every line get mushed together).
So, what does this mean? It’s QuickAdd format syntax. It basically says to capture a link to the currently open note, as well as any comments I want to add. You need to add some comment, otherwise it’ll be ignored.
This capture is super important to the workflow. It is, without a doubt, what has helped me most in writing the newsletter every week. The catch is that it requires you to remember to capture stuff. However, I’ve found that you start doing it automatically after a short while.
And this is how I write my newsletter in Obsidian. If you have any questions, feel free to reach out on Twitter (opens in a new tab).