How I Import Literature Notes into Obsidian
On this page
Importing highlights and notes into Obsidian for processing can be a very painful process without automation. So I automated it.
More precisely, I have automated the fetching and formatting of annotations, highlights, and notes taken on various platforms. Even better, I have made it possible to fetch new notes taken on an item and add them to your existing notes for that item.
Before I read things on the internet, I have a workflow that accumulates all of them in my Inbox (opens in a new tab). It’s how I curate what I should read. So when I have the chance to read something, I’ll find something in my Inbox and start reading.
While I read, I take notes. I usually do so using Readwise Reader (opens in a new tab), depending on the resource. I also use Readwise (opens in a new tab), which grabs the notes I take from various sources. Here’s a breakdown.
- Books I read on my phone with Readwise Reader (opens in a new tab). Notes are automatically synced to Readwise.
- Articles I previously used Hypothes.is (opens in a new tab) to write notes. These are synchronized to Readwise (opens in a new tab). Now I use Reader here as well.
- Tweets I send directly to Readwise (opens in a new tab).
- YouTube videos I use a template in Obsidian along with the Media Extended (opens in a new tab) plugin to write notes with timestamps.
- Podcast episodes I use PodNotes (opens in a new tab) to write notes on podcasts. This is much faster and more reliable (in my opinion) than other services. Check that out instead! Instructions in this post will follow my previous workflow, so you can choose whichever fits you best.
This is fine, but it only covers the initial annotation workflow. So let’s talk about how I import the notes into Obsidian with EzImport.
Importing into Obsidian
EzImport is a script I’ve created for QuickAdd (opens in a new tab). It will grab highlights for any resource and create a note (or update it) with those highlights.
There are multiple good importers for Obsidian that import notes from Readwise (opens in a new tab):
- GitHub - readwiseio/obsidian-readwise: Official Readwise plugin for Obsidian (opens in a new tab)
- GitHub - renehernandez/obsidian-readwise: Sync Readwise highlights into your obsidian vault (opens in a new tab)
- GitHub - jsonMartin/readwise-mirror (opens in a new tab)
In fact, the official Readwise (opens in a new tab) plugin came very close to replacing this workflow for me. However, there are too many customizable features that I enjoy now, which it does not support. Most importantly, however, is that I don’t enjoy how the synchronization process works with any of those plugins. My notes feel much too fragile with them.
With EzImport, only two things can happen.
- The note does not exist, in which case it creates a new note and pulls in the highlights.
- The note does exist, in which case it checks if I have added new highlights since I last fetched them to the note. If I did, it updates the update time and appends the highlights to the bottom of the note. If I did not, it doesn’t do anything at all.
I can also entirely control the format of my note from within Obsidian. Likewise, I can control how the highlights are formatted through JavaScript code.
Alright. Enough about what it is, here’s how you can get it.
Setting up EzImport
First, you’ll need to install QuickAdd inside of Obsidian. Just go to community plugins and grab it from there.
Now, place the EzImport script in your vault. You can download it here (opens in a new tab). It doesn’t really matter where you put it. Now you’ll want to create a macro which activates the script. The fastest way is to create a Macro by writing a name, selecting Macro in the dropdown, and then clicking Add Choice. Then you can click the + button to create the macro associated with the Macro ‘choice’. Now, click the cog (⚙️) button to access the macro configuration.

You can also follow along in my video instructions on how to use QuickAdd (opens in a new tab). It takes a different route (older), but is still valid.
Now that we’ve installed the script, we need to set it up. The macro will look somewhat like this (depending on what name you chose) when we’re done:
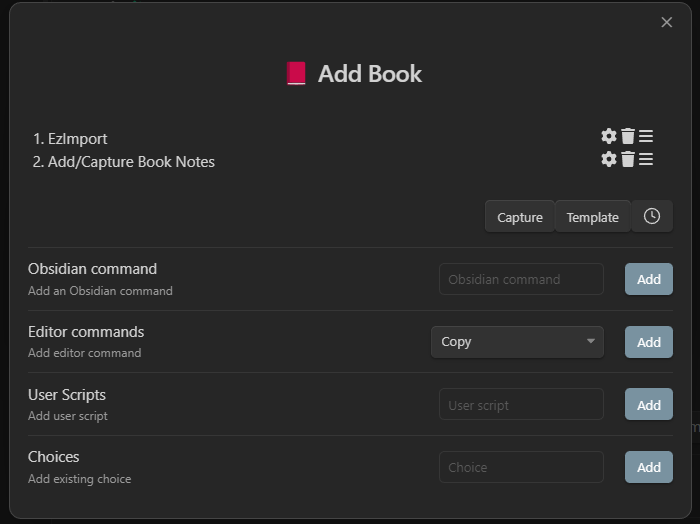
First, add the script to the macro. This is done by entering the name of the script in the Script field and clicking Add. In my case, it’s EzImport.
Now you’ll want to click the configure ⚙ button for the script. In there, you’ll be met with something like this:
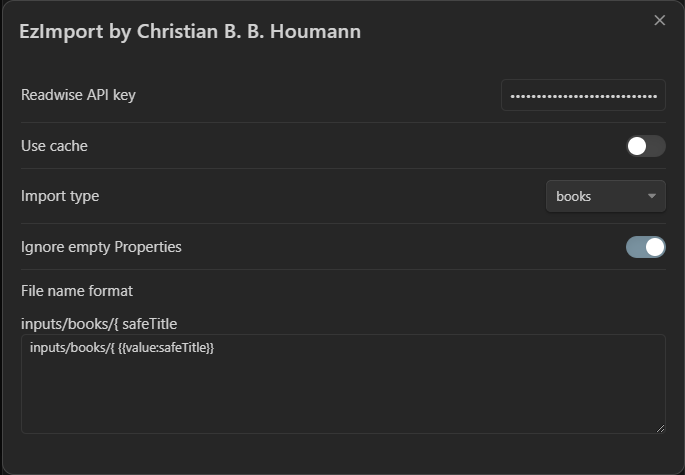
Except, of course, mine already has a blurred API key and some settings. Here’s what the settings mean. The first setting is your Readwise API key. You can get that here (opens in a new tab). It’s used to grab the highlights.
Next is Use cache. This will remember which resources you’ve already imported, so you won’t get prompted to import them again. It can be useful, but for most users, I’d recommend keeping it disabled. It blocks you from importing resources you’ve already imported, preventing you from importing new annotations.
The Import type denotes the type of resource you’re importing. In this example, I’m importing books, so I’ve selected Book. Readwise imports a lot of things as articles, so you’ll need to make sure you select the correct type. If you’re not sure, you can always check your Readwise highlights (opens in a new tab).
Enabling Ignore empty properties will prevent QuickAdd from asking you about a value if Readwise doesn’t have it. I recommend enabling it.
Finally, is File name format. This is what determines the file name your imported note will have. You can use whatever format syntax (opens in a new tab) you want here. Mine starts with the folder I want to place the created note in. For books, this is inputs/books. All of my input sources have some symbol in front of them to prevent conflicts with other (evergreen) notes. And for convenience, if a note has { in front of it, I always know that it’s a book.
The {{VALUE:safeTitle}} is very important. safeTitle is the title of the resource you’re importing from, but without illegal file name characters. That means, without commas, question marks, and so on. To increase searchability, I put the actual title of the resource as an alias. You’ll see how that works later.
Setting up the Capture
At this point, we’ve set up the first part of the process - the script that grabs all the highlights and metadata.
Now we need to set up the Capture that will do the note creation and updating.
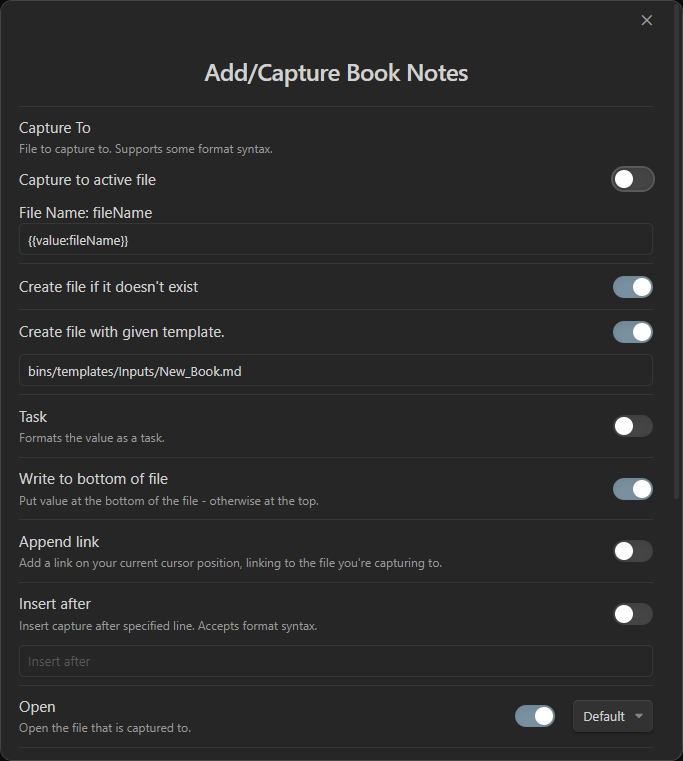
Click the Capture button on the macro settings screen. It’ll add an untitled capture to the macro, right after the script.
We’ll want to set it up with a few settings. It’ll look like this when we’re done.
This setup works with all types of resources you can import from Readwise.
So, let’s get to setting this up. First, you can change the Capture name by clicking the title. This is purely for aesthetics, but it’s nice to have a descriptive name.
Here is how you should configure the Capture:
- Capture to
{{value:fileName}}: mandatory. This is the file name we set up in the script. - Create the file if it doesn’t exist (mandatory).
- Create file with given template, and then specify a template. You can use mine entirely or for inspiration; they’re optimized for this workflow. You can find them below.
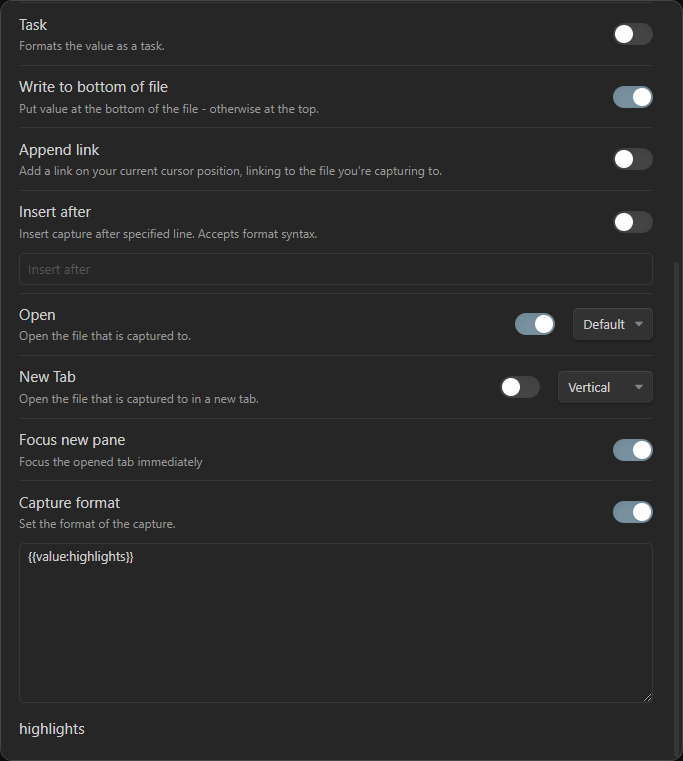
- Write to bottom of file; otherwise, when you add new highlights, they’ll be added to the top of the file.
- Open: kind of self-explanatory; it opens the file.
- Capture format of
{{VALUE:highlights}}: mandatory if you want to synchronize your highlights. This inserts your highlights when you activate the Capture Choice.
The capture uses the template to create the note. The template is what determines the format of the note. You can use the templates I’ve created, or you can create your own. I’ll show you how to do that in a bit.
Templates
The following are my templates.
These templates can just be copied into your Obsidian templates folder. Both Templater and the core Templates plugin will work.
Books
---
image:
tags:
  - in/books
  - state/process
aliases:
  - "{{VALUE:title}}"
cssclasses:
lastHighlightAt: "{{value:lastHighlightAt}}"
shouldPublish: true
rating: "{{VALUE:10,9,8,7,6,5,4,3,2,1,0}}"
author: "{{value:author}}"
Reference: ""
Reviewed Date: ==UPDATE==
Finished Year: "[[{{DATE:gggg}}]]"
---
# {{VALUE:title}}
---

# Thoughts

# Actions Taken / Changes

# Summary of Key Points

# Highlights & Notes
Tweets
---
tags: in/tweet state/process
aliases:
  - '{{VALUE:title}}'
cssclass: null
lastHighlightAt: "{{VALUE:lastHighlightAt}}"
---

Title:: {{VALUE:title}}
Type:: [[!]]
Tags::
Account:: {{VALUE:author}}
Rating:: {{VALUE:10,9,8,7,6,5,4,3,2,1,0}}
Link:: {{VALUE:source}}
Reviewed Date:: [[{{DATE:gggg-MM-DD - ddd MMM D}}]]

---
Articles
---
tags: in/article state/process
aliases:
  - "{{VALUE:title}}"
cssclass: null
lastHighlightAt: "{{VALUE:lastHighlightAt}}"
Author: "{{value:author}}"
Link: "{{value:source}}"
Reviewed Date:"[[{{DATE:gggg-MM-DD - ddd MMM D}}]]"
Rating: "{{VALUE:10,9,8,7,6,5,4,3,2,1,0}}"
Reference: ""
---

# {{value:title}}
---

## Notes
Youtube videos
---
tags: in/video state/process
aliases:
  - '{{VALUE}}'
cssclass: null
---

Title:: {{VALUE}}
Type:: [[+]]
Tags::
URL:: https://www.youtube.com/watch?v={{VALUE:📺 YouTube Video ID}}
Channel::
Reference::
Publish Date::
Reviewed Date:: [[{{DATE:gggg-MM-DD - ddd MMM D}}]]

---

<center><iframe width="560" height="315" src="https://www.youtube.com/embed/{{VALUE:📺 YouTube Video ID}}" frameborder="0" allow="accelerometer; autoplay; encrypted-media; gyroscope; picture-in-picture" allowfullscreen></iframe></center>

---

-
My workflow for videos is slightly different. You’ll need to create a Template Choice for QuickAdd with the above template. It should look like this:

You specify the template path, define the file name, and optionally select a folder to place it in.
{{VALUE}} will make QuickAdd ask you what the video title is, which I usually just copy from the video page.
You’ll also be asked for a video ID. You get this from the video link. Let’s take https://www.youtube.com/watch?v=gYK3VDQsZJo as an example. Here, the gYK3VDQsZJo is the ID. So just paste that in. This is the end result:

Making your own templates
I won’t force you to use my templates, so here is a small guide to creating your own. As I mentioned, the file name should be created with {{VALUE:safeTitle}}. But there are more variables that you can access and use in your templates.
{{VALUE:safeTitle}}is the resource title without illegal file name characters{{VALUE:fileName}}is the final file name{{VALUE:title}}is the title of the resource{{VALUE:author}}is the author’s name in wikilinks, i.e.,[[Adam Smith]]{{VALUE:source}}is the source URL of the resource{{VALUE:tags}}are the tags from the resource{{VALUE:cover}}is the cover image URL for the resource{{VALUE:lastHighlightAt}}is the date and time at which the latest highlight was added{{VALUE:updated}}is the date and time at which the resource was updated in Readwise{{VALUE:numHighlights}}is the amount of highlights for the resource
You can use any of these in your template. I strongly encourage you to have a YAML field with lastHighlightAt to enable updating of your note.
Bonus: Unprocessed Note Inbox
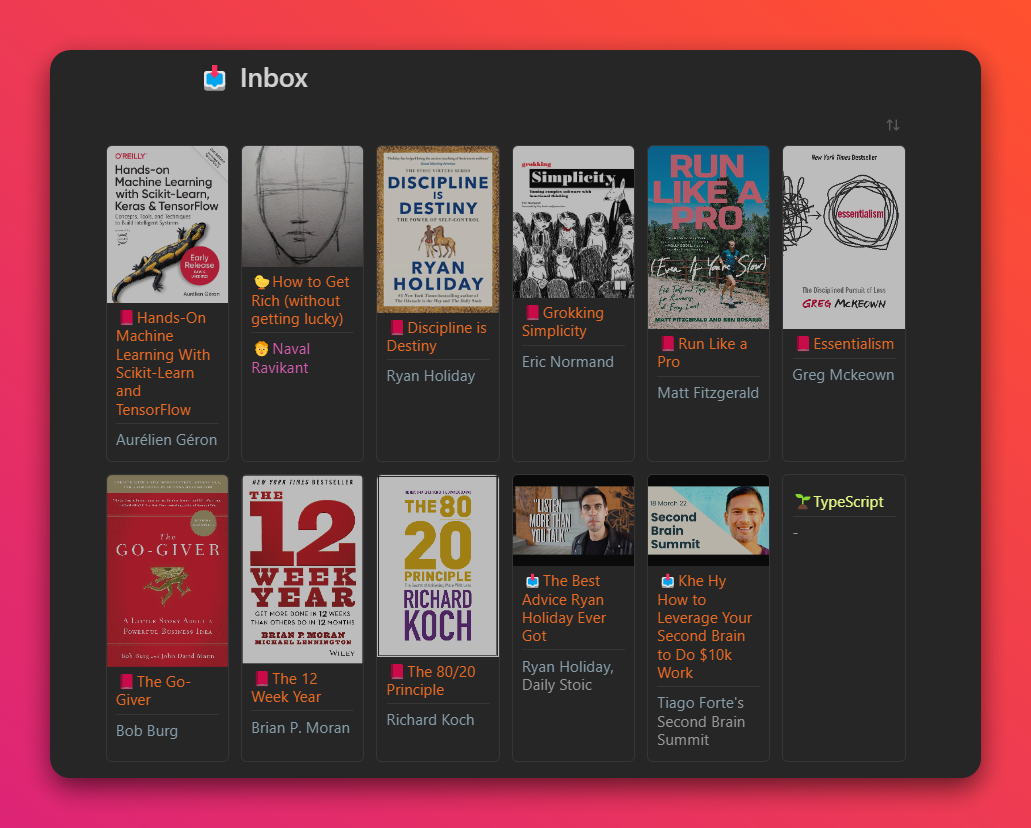
For me, both reading and processing a note can’t happen during the same session. Sometimes I rack up a ton of unprocessed notes, and they’re all just sitting in the back of my mind, waiting for me to get back to them.
My solution? An Unprocessed Note Inbox. If you use my templates (or the #state/process tag), you can use this Dataview query!
Once you’ve imported notes of various kinds, you can use the following Dataview (opens in a new tab) query to display them all:
```dataview
TABLE WITHOUT ID
("") as cover,
(link(file.link, aliases)) as title,
default(author, default(default(default(Author, Account), Channel), Podcast)) AS by
FROM #state/process and !"inputs/literature_notes" and !"bins"
SORT image desc
```To display the notes as cards like I am, you will need the Minimal theme (opens in a new tab).
Now you can use the cards CSS helper class (opens in a new tab).
In my dashboard, which is where my inbox lives, I use cssClasses: cards table-wide cards-cover cards-cols-6.
You might also like to show images for thumbnails.
This will require some modifications to the templates.
Books template: Simply add a frontmatter property image. Then, once you add a book, go hunting on Google for an image URL. I usually look for Amazon links, as they seem to be most reliable.
Podcasts template: This is the template I use when creating podcast notes with PodNotes (opens in a new tab):
---
tags: in/podcast state/process
aliases:
  - "{{VALUE:title}}"
cssclass: null
image: "{{VALUE:artworkUrl}}"
---

# {{VALUE:title}}
### Metadata
Type:: [[%]]
Tags::
Podcast:: [[{{VALUE:podcastName}}]]
Title:: {{VALUE:title}}
URL:: {{VALUE:url}}
Guest::
Reference::
Reviewed Date:: ==UPDATE THIS==

### Description
> {{VALUE:description}}

---
## Notes
YouTube video template: Simply add this to your frontmatter if you use my workflow (presented in previously mentioned article):
image: https://i.ytimg.com/vi/{{VALUE:📺 YouTube Video ID}}/hqdefault.jpgThat fetches high quality thumbnails from YouTube, given the YouTube video ID.
And now you can use this query instead, which displays images.
```dataview
TABLE WITHOUT ID
("") as cover,
(link(file.link, aliases)) as title,
default(default(default(Author, Account), Channel), Podcast) AS by
FROM #state/process and !"inputs/literature_notes" and !"bins"
SORT image desc
```So let me just explain the query.
It creates a table (without ID, i.e. file name/path) with three columns: cover, title, and by.
To populate this table, it looks for all files tagged #state/process that are not in the inputs/literature_notes folder nor the bins folder.
It then sorts these by the files’ image property (in the frontmatter). This is such that, if you add notes without images, they’ll be shown last.
Another great use: whenever there’s a note I really want to revisit, I add it to my inbox. In the screenshot, you’ll see Typescript, which is a note that I want to come back to. Notes you add to this inbox don’t have to be inputs, it can be any note you tag with #state/process.
Any questions, requests, or otherwise? Feel free to reach out (Twitter (opens in a new tab)).
Sign up for my newsletter below 👇 to get updates and be the first to hear when I release new posts like this.