How I Manage Projects and Goals in Obsidian
On this page
I created a system in Obsidian that allows you to manage your goals and projects easily.
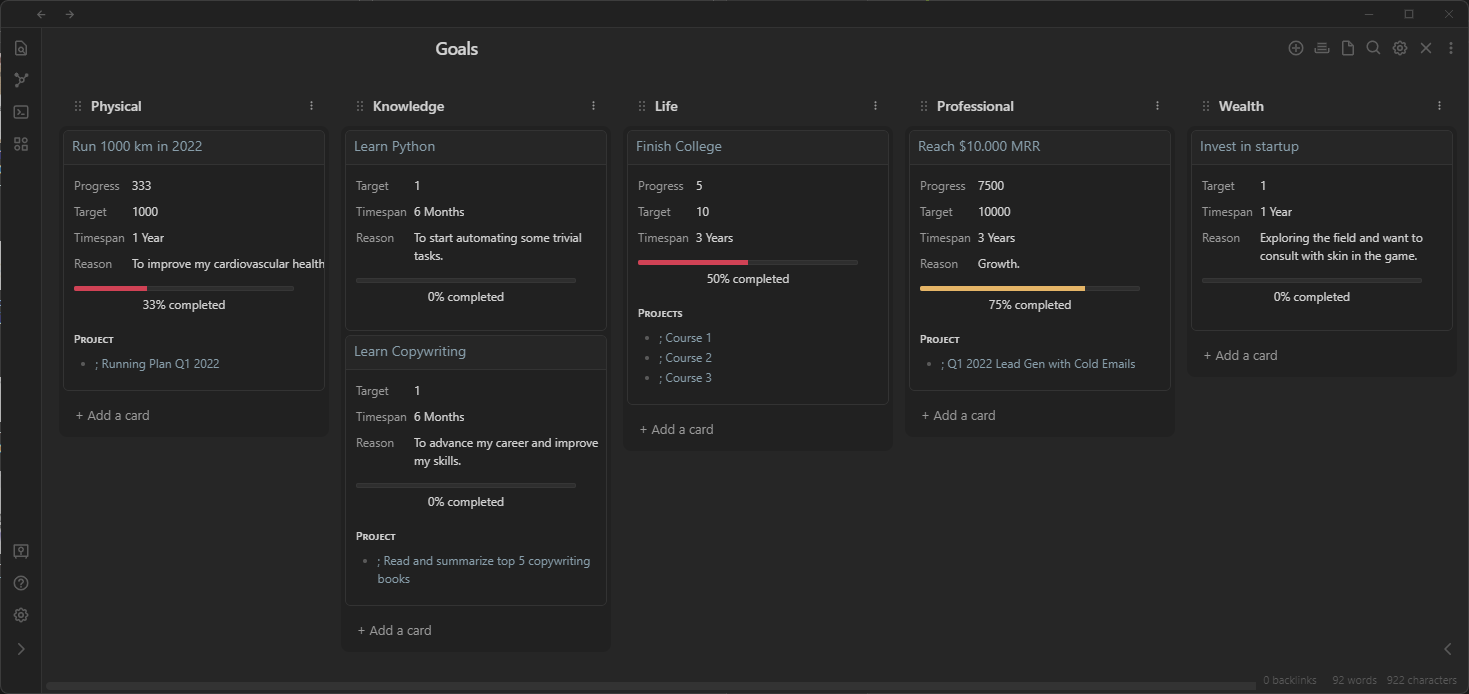
You get a Kanban overview—as seen in the image above—as well as a dashboard for your goals and projects.
Projects are used to achieve goals, so we link them together to see where and how we’re making progres.
Let’s get started.
Required plugins & theme
We use a few plugins to facilitate this system and its workflows. I’ll explain what each of them does, and why it’s there. Then you can make the decision to leave it out, if you don’t want it. Click the links to open the plugin in the Obsidian Plugin Store.
- The Minimal Theme: Makes the whole thing beautiful to look at. Cards will not work in the dashboard without it.
- Contextual Typography (opens in a new tab): Necessary for (our usage of) Minimal.
- Dataview (opens in a new tab): Necessary. Facilitates all the dynamic properties and views.
- QuickAdd (opens in a new tab): Automates the creation of goals and projects, which would otherwise require quite a few steps to create.
- Kanban (opens in a new tab): Places both Goals and Projects in a nice overview that helps make sense of them.
- MetaEdit (opens in a new tab): Whenever you move cards between lanes in the Kanban board, this automates the updating of properties. This makes the back-end work for seeing which projects relate to which goals.
I’ve made both QuickAdd and MetaEdit. You’re free to ask me questions regarding them (or this system).
Setting up the system
I’ve tried to make setup as easy as possible. No matter if you’re starting from scratch with Obsidian, or just want to add something new to your workflow, I’ve got you covered.
Step 0. Download the vault
You can find the entire Obsidian Vault with this system (and everything set up) here: Christian’s Demo Vault (opens in a new tab).
You’ll want to download the repository. You can do that by clicking “Download ZIP”, which is under the “Code” menu. You can also open each file individually and copy & paste, if you prefer.
If you don’t have an obsidian vault yet, you can just download the vault and you’re done.
However, if you already have an existing vault and want to add this system, here’s how. Don’t worry, it’s super quick.
Step 1. Copy & pasting
First, make sure you’ve installed and enabled the required plugins and themes.
Inside your vault, you’ll want places to store your goal notes, your project notes, the templates we use to create them, and a folder called views to store the Dataview scripts this system uses.
You can create the folders wherever you want.
Let’s take it in steps:
- Create folders for
goalsandprojects - Copy the
viewsfolder into your vault (you can put in in a folder, if you want) - Copy the templates into your vault. If you have a templates folder, just copy the two templates into it.
- Copy the markdown files,
Dashboard.md,Goals.md, andProject Board.mdinto your vault. This saves you some setup time. The Kanban board already have some cards, but you can just delete them.
All done copy & pasting! Now we just have to set up the plugins.
Step 3. Setting up the plugins
You’re actually already done with setting up all of them except Dataview, MetaEdit, and QuickAdd.
Dataview
Open Obsidian’s settings, find Dataview’s settings, and enable the following:
- Enable JavaScript Queries
- Enable Inline JavaScript Queries
- Enable Inline Field Highlighting
MetaEdit
Open Obsidian’s settings, find MetaEdit’s settings, and do the following:
- Enable Kanban Helper
- Select the Project Board
- Write
statusin the field under “Property in link.” - Do the same for Goals, and write
Typeunder “Property in link.”
It should look somewhat like this:

Setting up QuickAdd
Open Obsidian’s settings, find QuickAdd’s settings, and do the following.
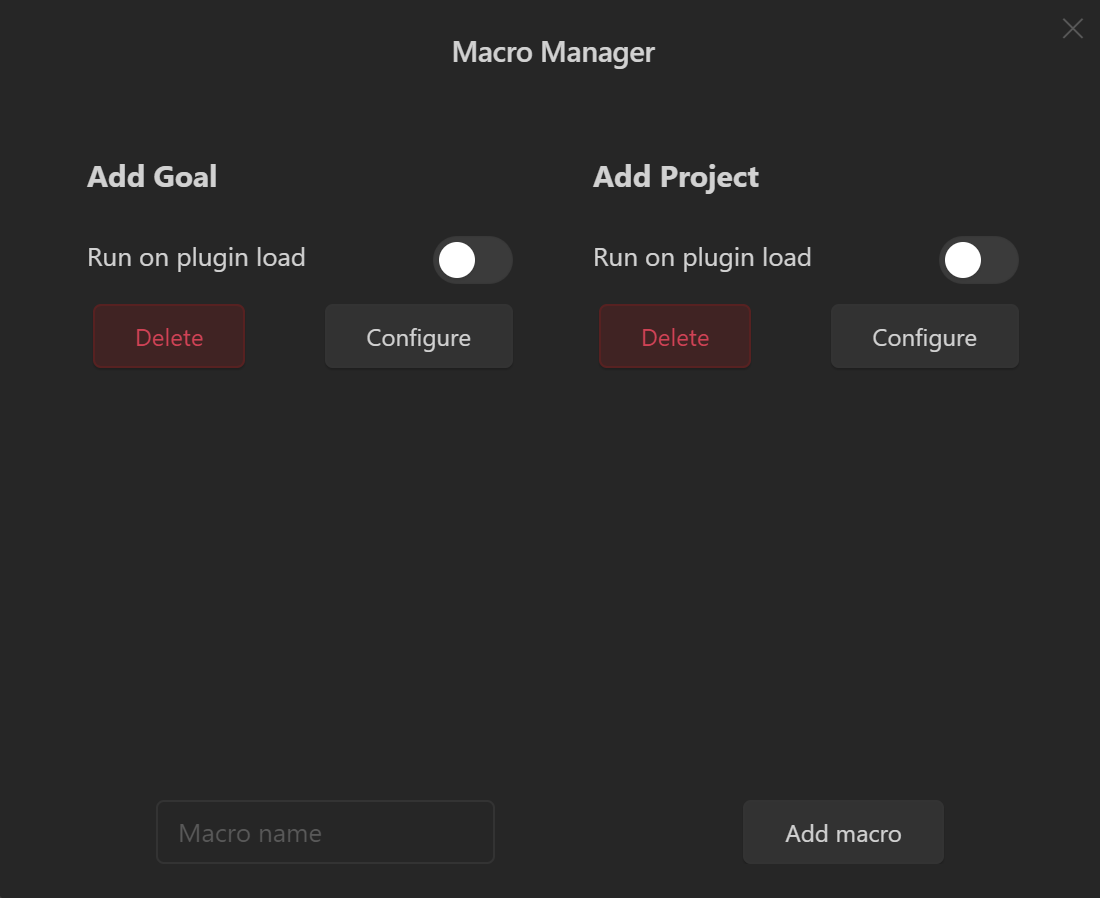
First, click “Manage Macros.” Then, add two new macros: Add Goal and Add Project. We’ll configure these now.
I have made a video on how you can use QuickAdd, which shows how you can use the interface and the various aspects. Click here to see it (opens in a new tab).
Configuring Add Goal
Click configure on Add Goal. Now we need to add the steps. To add them, click “Template”, then click the clock button, and lastly, click “Capture.”
This should have added three steps to the macro.
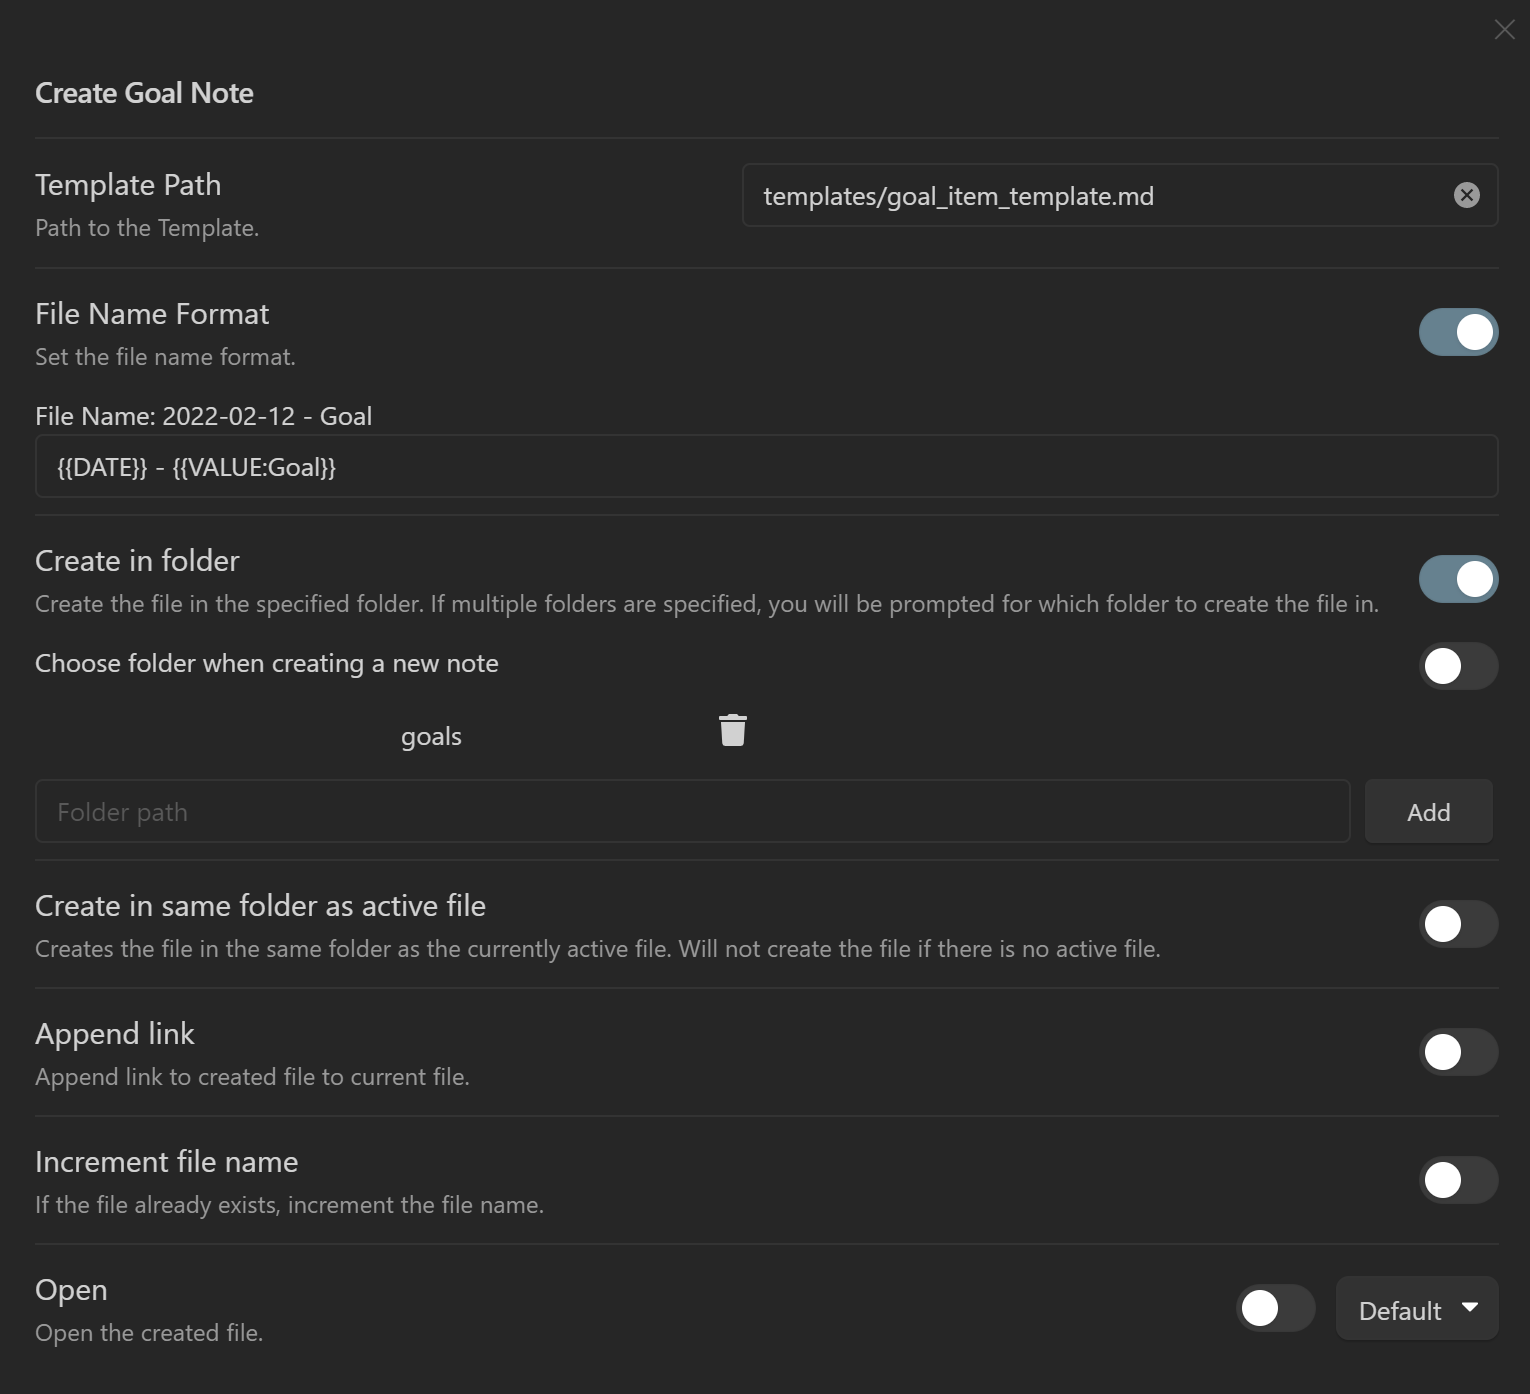
Click configure ⚙ on the first one (“Untitled Template Choice”). You can click the title of it to change its name. I recommend “Create Goal Note.”
You should configure it such that
- The template path points to the template we inserted for goals
- It has a file name format that says:
{{DATE}} - {{VALUE:Goal}}- This makes it such that the file name of the created file contains the data and goal title. If you change this, you need to change the capture as well!
- Make it add the note to the right folder.
For me, this looks like so:
Go back out to the macro. Set the wait delay to 200 ms.
Now, click configure ⚙ on the third one (“Untitled Capture Choice”). I called this Send to Kanban Board.
Configure it like this:
- Capture To should be the path to the Kanban board with your goals. Mine is simply
Goals.md. - Enable Task.
- Insert after:
## {{VALUE:Professional,Physical,Knowledge,Wealth,Life}}- This ensures that you’re asked which lane you want to add the card to, and then adds the card to that lane.
- Enable Capture Format, and make it:
[[{{DATE}} - {{VALUE:Goal}}|{{VALUE:Goal}}]]- This is very important, as it links to the goal note you create. If you changed the file name format earlier, you’ll need to change it here, too.
And now we’re done with this macro. We’ll need to do something similar in Add Project.
Configuring Add Project
You’ll be doing something very similar here, so I’ll show you what mine looks like, and you can set yours accourdingly.
The macro:
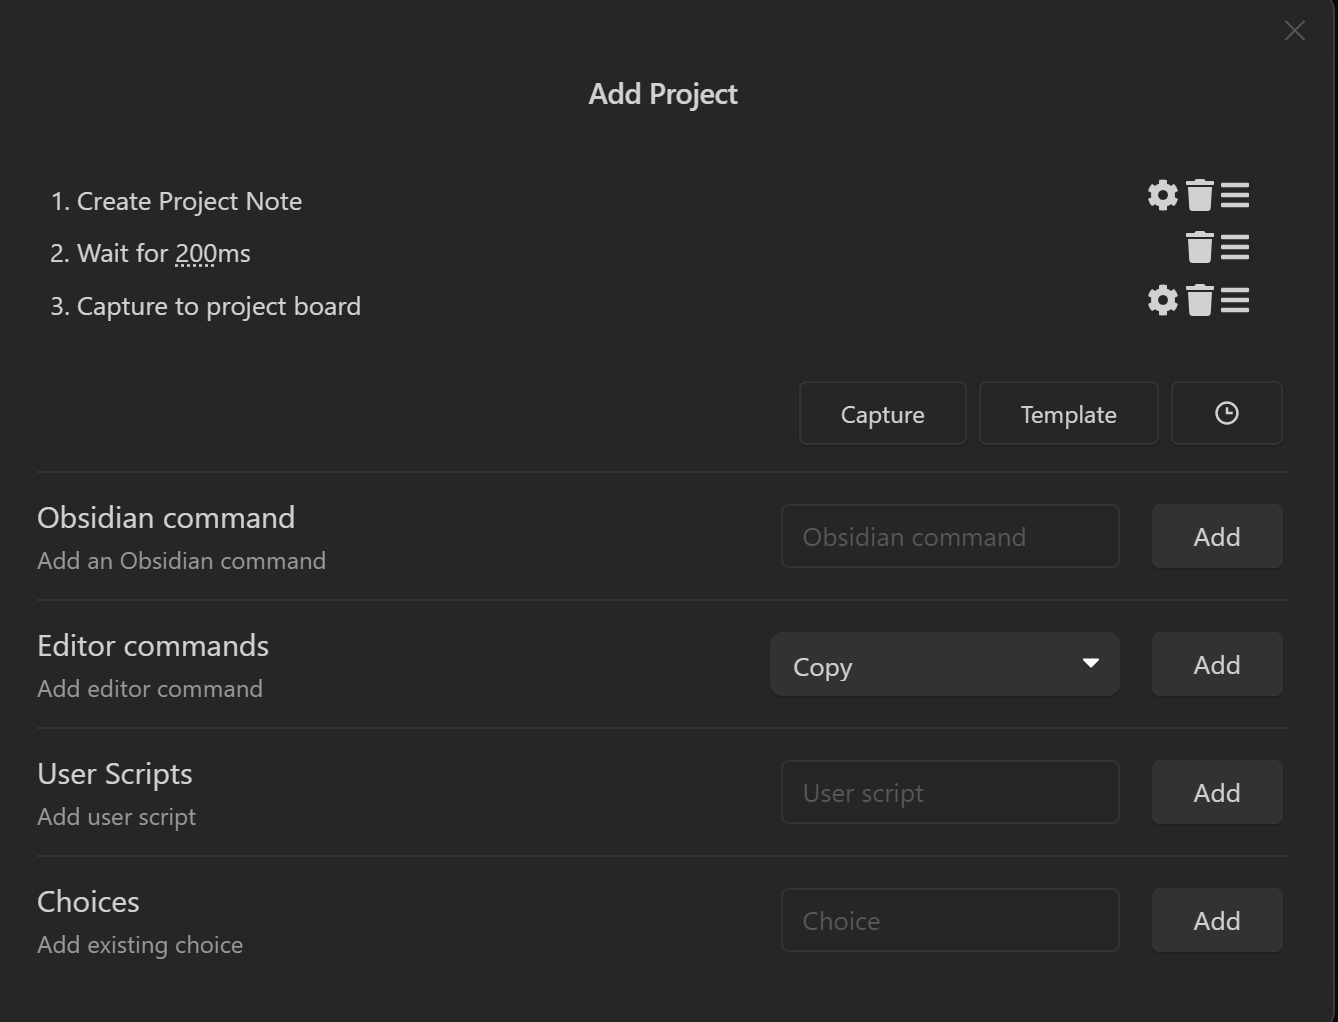
The Create Project Note step:

The Capture to project board step:
- Capture to:
Project Board.md - Task enabled
- Insert after:
## Todo - Capture Format:
[[; {{VALUE:⚒ Add Project}}|{{VALUE:⚒ Add Project}}]]
The principles are the same here.
Finishing touches
We’re almost completely done. Just need to set up the QuickAdd choices.
If you go back to the main settings for QuickAdd, you are able to add Choices. You’ll want to add two macro choices, which means that you select “Macro” from the drop-down menu and add it.
I named mine 🎯 Add Goal and 👷 Add Project, respectively. Now you’ll want to click the configure ⚙ button for these and select the appropriate macro.
At this point, you are finished setting everything up. You can now add projects and goals as you
want.
In How it works, I’ll describe how everything works behind-the-scenes.
Updated: Auto Tracking
Since making this system, I’ve added a feature that automatically tracks your progress on goals.
This is the ‘auto-track’ feature.
It works by using tasks inside your goal & project notes.
A task in one of these notes contributes to the progress of the goal/project.
The progress is calculated by the number of tasks that are completed, divided by the total number of tasks.
For a goal, this is the sum of all tasks in all project notes that contribute to the goal and tasks in the goal note.
You can use this in your own vault by copying the autotracking_goal_item_template.
This template is akin to the goal_item_template, but facilitates the task tracking.
I’ve added a QuickAdd choice, 🎯 Add Auto Tracking Goal, to the vault for creating an auto-tracked goal. It is basically the same as the Add Goal macro, but uses the autotracking_goal_item_template instead. To replicate this in your own vault, create a macro called Add Auto Tracking Goal and configure like the other Add Goal macro, but using the autotracking template instead.
How it works
The system leverages multiple plugins that work in tandem to create the full experience. Each of them play their own part.
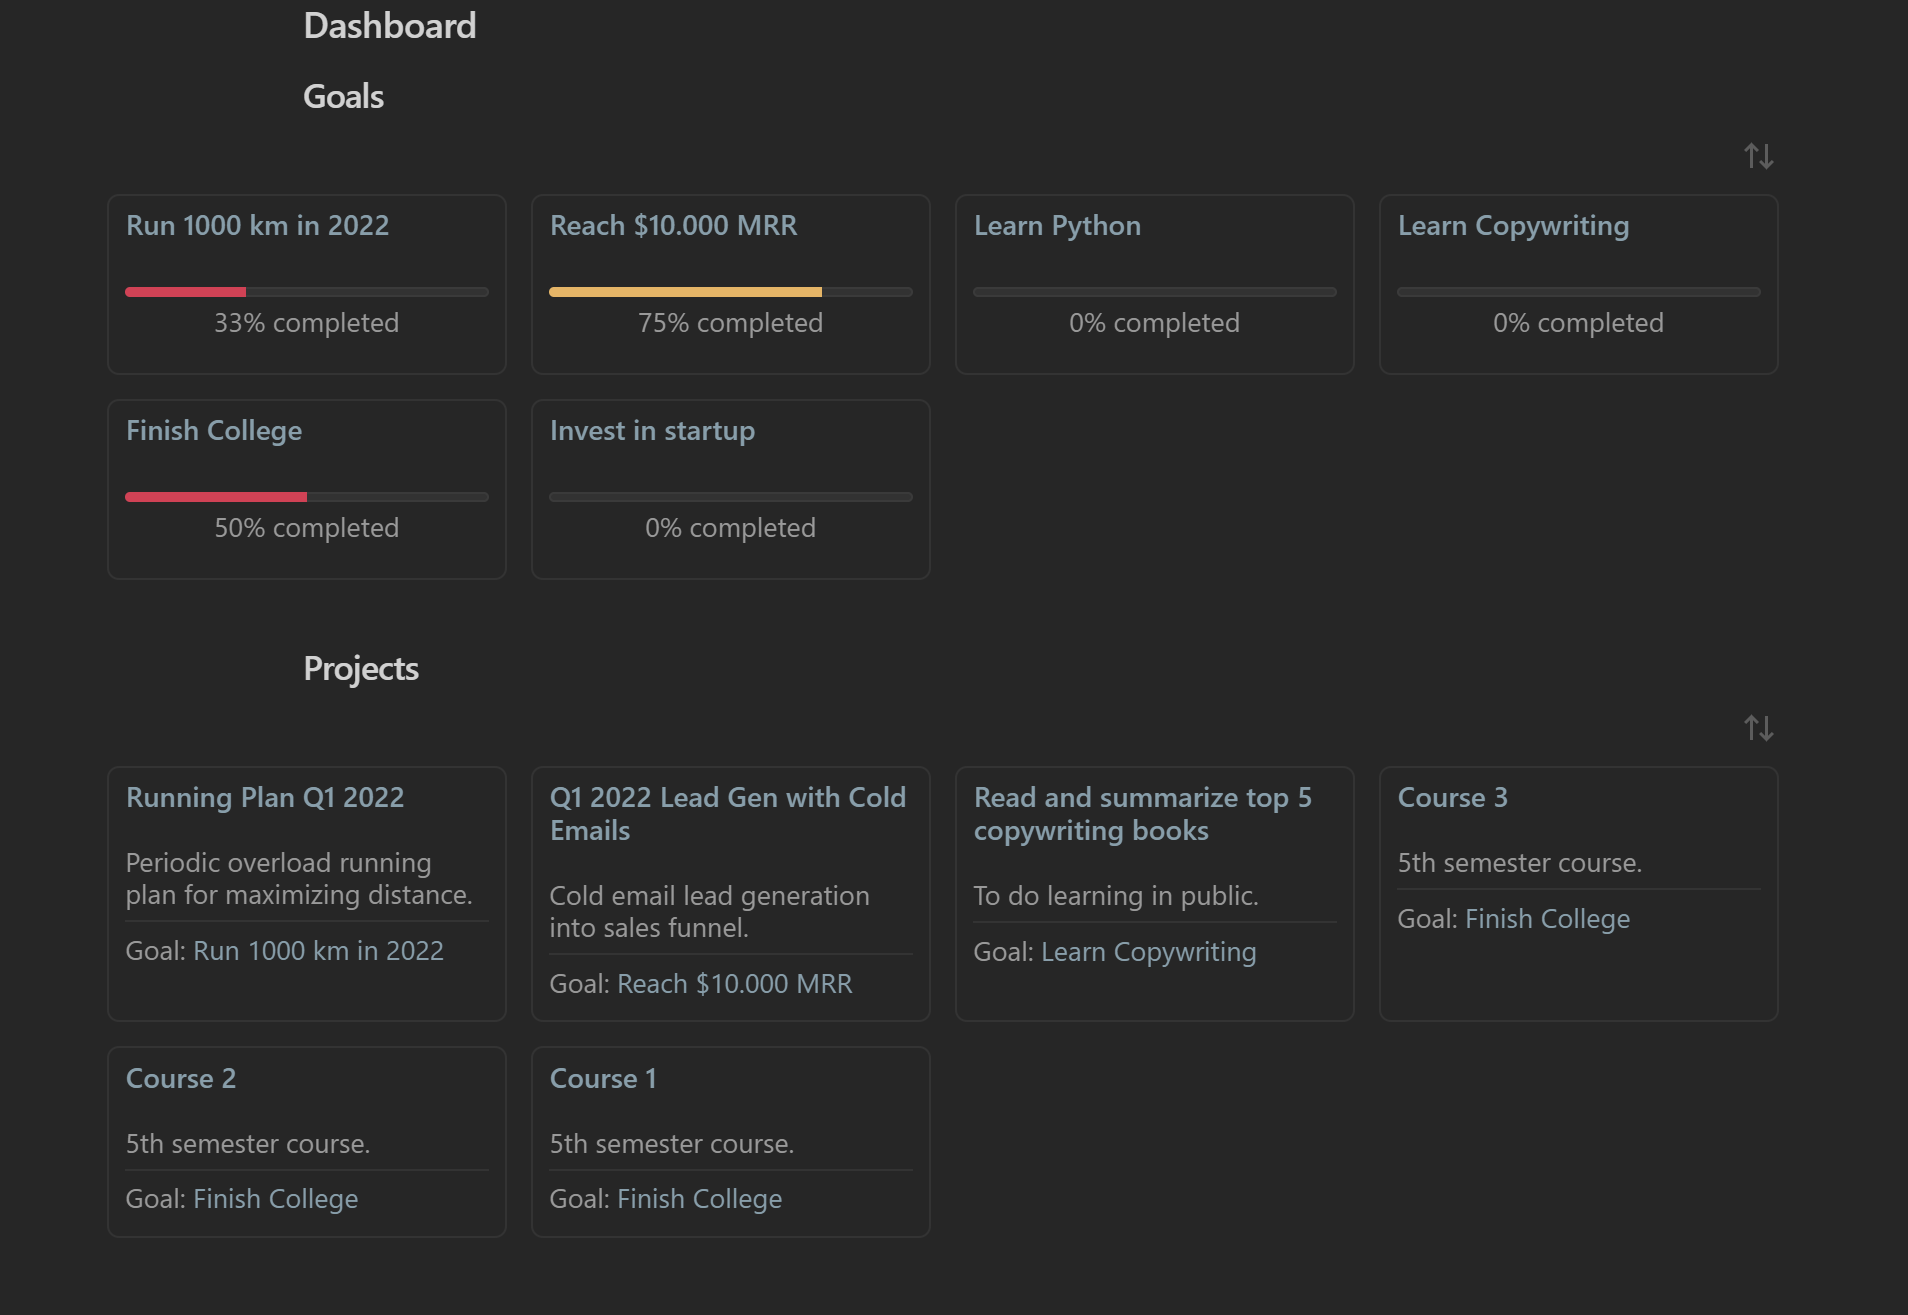
The Dashboard
This is where you can get an overview of your active projects and goals. It’s great for getting an overview.
We have to Dataview queries on the page. The first one displays Goals in a table, which Minimal transforms into a cards view. We depend here on having set an alias, which we use to link to the goal. We also rely on ‘aggregating’ the Bar metadata property, which creates the progress bar.
This view only shows goals where the progress isn’t equal to the target. In other words, goals that aren’t yet achieved.
The dashboard also shows projects. Like with goals, these are shown in a cards view. Only active projects are shown. Information about the project and the goals it contributes to is also shown.
Goals
Starting with the Kanban board, it simply shows goals and information about them. The Kanban plugin allows you to show metadata properties from your notes, and we show all relevant information here. This page is great for getting an overview over your goals and what you are doing to achieve them.
Only projects that are active, i.e., “In Progress,” are shown here. You are able to see all projects that are linked to a goal by opening the goal note.
Each goal note has a few noteworthy frontmatter fields
tags, which should always includegoal.alias, which is an alias that has the goal name, but without the date. This is set automatically by QuickAdd.Typedenotes the type of goal. This is automatically updated by MetaEdit, as it represents your goal area. This allows you to later query your goals by type with Dataview.Progressrepresents your current progress towards your target goal. This could be semesters finished for your bachelor’s degree.- Notably, you can also count down towards something. This requires that you add an additional YAML property called
Start. This would allow you to set goals where your target is lower than your progress, and the goal is to reduce your current amount. TheStartproperty denotes your starting point, and is necessary to calculate your progress percent. It is, however, not necessary if you are counting upwards, as a start of 0 is assumed.
- Notably, you can also count down towards something. This requires that you add an additional YAML property called
Targetrepresents the goal target.Reasonis your reason for undertaking the goal. Why are you doing it in the first place?Timespandenotes the timespan for your goal.Baris a Dataview field. It leverages an inline Dataview query to display a custom Dataviewjs view calledprogress-bar. This is what is contained within theviewsfolder. It is also what does the calculations and displaying of the progress bar.Projectsis also a Dataview field with an inline Dataview query. This query searches for all links into the goal note with the#projecttag. It also constrains the projects to those that are “In Progress”, which is denoted by their lane in the Project Board.
Further down on the goal note you’ll find a Dataview table that displays all projects undertaken to achieve the goal.
I have included headers in the goal note template that you might find useful, but you are free to change the contents of the note as you see fit.
Projects
Projects work in much the same way. As you move projects around on the Kanban board, their status updates.
In each project note, you’ll find some notable frontmatter.
tagsshould always containproject, which marks the note as a project.aliasis similar to the goal note alias.statusdenotes the project status. This field is automatically updated by MetaEdit as you move projects around on your Kanban board.subtitleis the subtitle for your project. Additional information, or project purpose, might be interesting to add here.Goalis an inline Dataview field. This links to the relevant goal note. Linking to goal notes allow you to connect your action items to their “why,” which is represented by your goal note. You can connect a project to multiple goals, as long as you comma-separate them.
In this template I have also included some relevant headers. You are, again, free to change these and adapt the note to your own needs.
If you found this useful, consider buying me a coffee (opens in a new tab).
Make sure you sign up for my newsletter below to get updates on this and similar projects.