Notes on
Node.js Design Patterns
by Mario Casciaro and Luciano Mammino
On this page
- Preface
- 1. The Node.js Platform
- 2. The Module System
- 3. Callbacks and Events
- 4. Asynchronous Control Flow Patterns with Callbacks
- 5. Asynchronous Control Flow Patterns with Promises and Async/Await
- 6. Coding with Streams
- 8. Structural Design Patterns
- 9. Behavioral Design Patterns
- 10. Universal JavaScript for Web Applications
- 11. Advanced Recipes
- 12. Scalability and Architectural Patterns
- 13. Messaging and Integration Patterns
You can find the official code examples and resources in the book’s GitHub repository (opens in a new tab).
I also kept my own notes while working through the book.
Preface
Why Node.js is great:
- Sharing code between client and server due to JavaScript
- Node.js’s single-threaded programming model & its asynchronous architecture
- Mutexes are replaced by queues, threads by callbacks, and synchronization by causality
- These are simpler, but still extremely powerful
- The npm package and ecosystem / the community
1. The Node.js Platform
How Node.js works
I/O is slow.
In blocking I/O programming, the function call corresponding to an I/O request blocks the execution of the thread until the operation completes.
Obviously, web servers that are implemented using blocking I/O won’t be able to handle multiple connections on the same thread. Each I/O on a socket will block the processing of any other connection.
Usually we solve this with a separate thread or process to handle each concurrent connection.
Then, a thread blocked by an I/O operation won’t impact the availability of the other connections—they’re handled in separate threads.
We usually do a good bit of I/O per request (db calls, filesystem, etc.).
Threads are not cheap in terms of system resources (consumes memory & causes context switches). So having a long-running thread for each connection & not using for it for most of the time means wasting memory and CPU cycles.
Most modern operating systems also support non-blocking I/O. Here, the system call always returns immediately without waiting for the data to be read or written. If no results are available at the moment of the call, the function just returns a predefined constant denoting there’s no data available to return at that time.
The most basic pattern for dealing with that kind of non-blocking I/O is to actively poll the resource within a loop until actual data is returned. This is called busy-waiting.
With this, we can handle different resources in the same thread. But it isn’t efficient.
The loop used to implement it consumes CPU cycles for iterating over resources that are unavailable most of the time.
Polling algorithms usually result in a huge amount of wasted CPU time.
Event demultiplexing
However, most modern operating systems provide a native mechanism to handle concurrent non-blocking resources efficiently: the synchronous event demultiplexer (or event notification interface).
Multiplexing refers to the method by which multiple signals are combined into one, so that they can be easily transmitted over a medium with limited capacity.
Demultiplexing is the opposite operation, whereby the signal is split again into its original components.
The synchronous event demultiplexer watches multiple resources and returns a new event (or set thereof) when a read or write operation executed over those resources completes.
Since the demultiplexer is synchronous, it blocks until there are new events to process, and therefore doesn’t waste CPU cycles on polling.
When it triggers, the resource that is associated with each event is guaranteed to be ready for the target operation. When all events are processed, the flow blocks again on the demultiplexer until new events are available for processing.
This is called the event loop.
This pattern lets us handle multiple I/O operations within a single thread, without the busy-waiting technique.
And since we don’t have to spread the tasks over multiple threads, we don’t get the added overhead from those.
Plus, having just a single thread is helpful for the mental model of the programmer regarding concurrency. No in-process race conditions and multiple threads to synchronize means we can use much simpler concurrency strategies.
The reactor pattern
This pattern is a specialization of the algorithms noted above.
The main idea is to have a handler associated with each I/O operation. In Node.js, these are represented by a callback function.
The handler is invoked as soon as an event is produced & processed by the event loop.
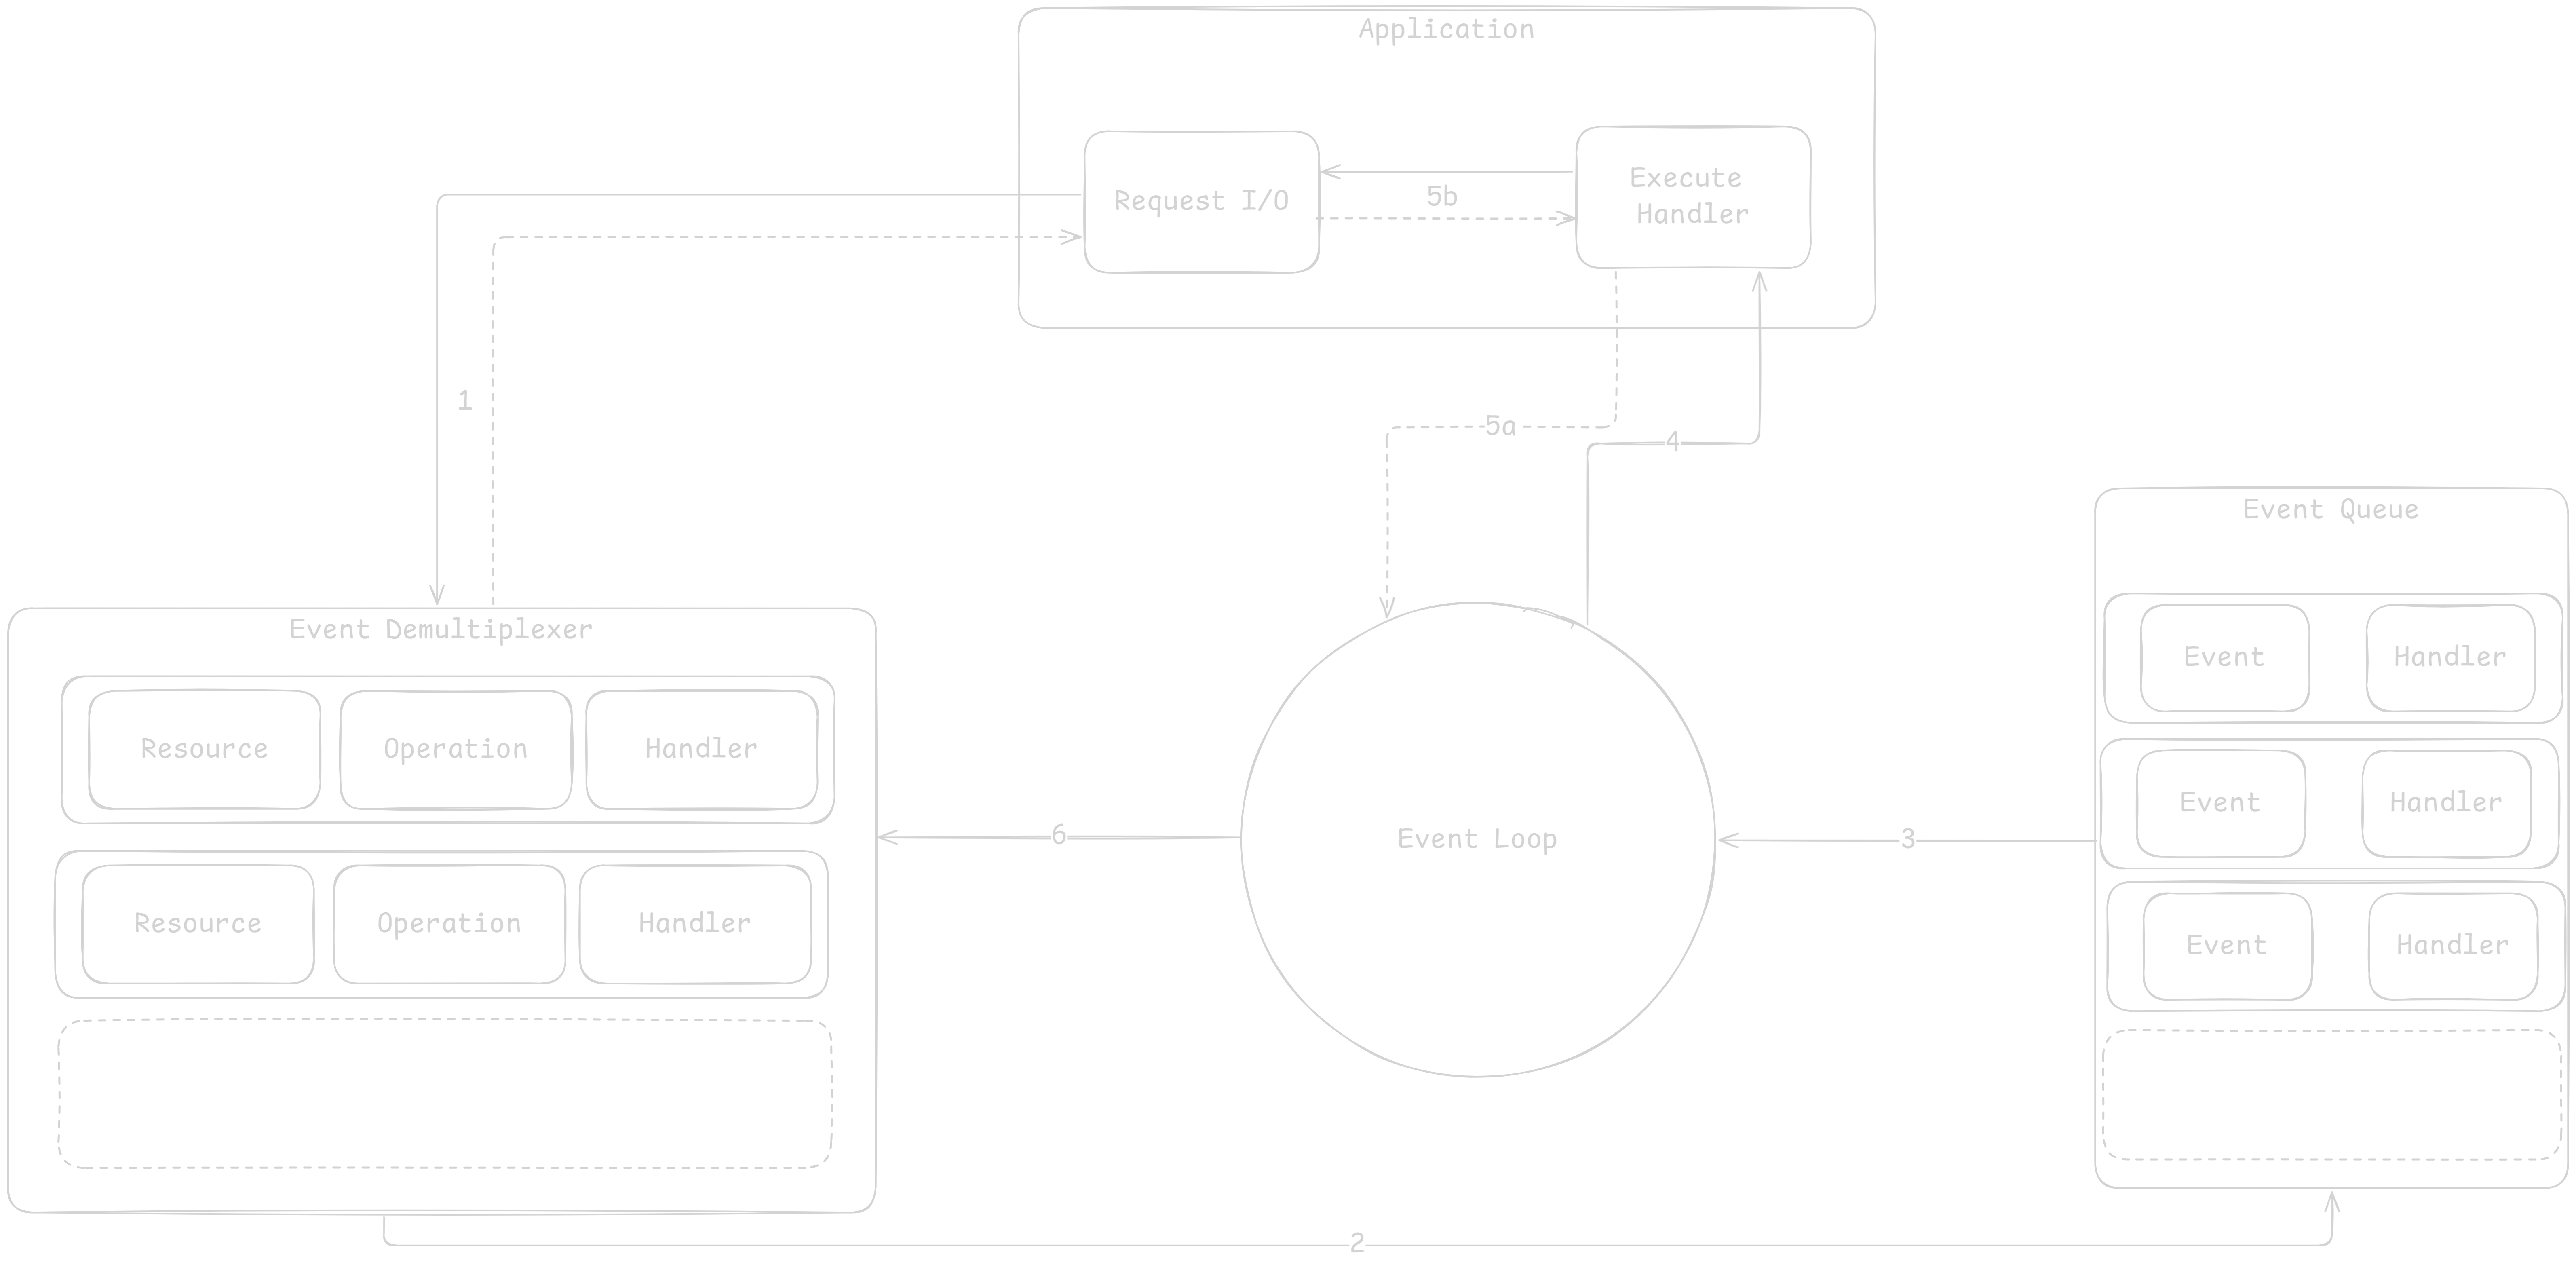
- App generates I/O operation by submitting request to Event Demultiplexer. It also specifies a handler to be invoked when the operation completes. Submitting is non-blocking and it immediately returns control to the app.
- When a set of I/O operations completes, the event demultiplexer pushes a set of corresponding events into the Event Queue.
- The Event Loop iterates over the items in the Event Queue.
- For each event, the event’s handler is invoked.
- The handler (part of app code) gives back control to the Event Loop when its execution completes (5a). While the handler executes, it can request new operations (5b), causing new items to be added to the demultiplexer (1).
- When all items in the Event Queue are processed, the Event Loop blocks again on the Event Demultiplexer, triggering another cycle when a new event is available.
The reactor pattern: handles I/O by blocking until new events are available from a set of observed resources, and then reacts by dispatching each event to an associated handler.
Libuv, the I/O engine of Node.js
Since there are discrepancies between the various operating systems, the Node.js team created libuv to make Node.js compatible with all major operating systems & normalize the non-blocking behavior of the different types of resource.
Libuv also implements the reactor pattern, providing an API for creating event loops, managing the event queue, running async I/O operations, and queueing other types of tasks.
Read more about libuv: An Introduction to libuv by Nikhil Marathe (opens in a new tab).
The recipe for Node.js
So the reactor pattern & libuv are the basic building blocks of Node.js, but we also need these for the full platform:
- A set of bindings responsible for wrapping and exposing libuv and other low-level functionalities to JS
- V8, the JS engine by Google for Chrome — also the reason why Node.js is so fast
- A core JS library implementing the high-level Node.js API
Javascript in Node.js
JS in Node.js is different from the JS we use in the browser.
Obviously there’s no window or document.
Node.js also has access to a set of services offered by the OS that aren’t available in the browser (browser even has security mechanisms to prevent that kind of access).
You don’t need polyfills with Node.js. Their purpose is to handle differences in browsers’ implementations of JS. But that isn’t relevant here.
But if you’re developing a library for 3rd parties, you do need to think about which version of Node.js it supports.
The original Node.js module system was CommonJS (uses require).
Now JS has the ES modules syntax (uses import), from which Node.js inherits the syntax (underlying implementation is different).
Node.js has full access to OS services.
E.g. the file system with fs, low-level TCP or UDP sockets with net and dgram.
We can create HTTP(S) servers with http and https. Or use the standard encryption and hashing algorithms of OpenSSL with crypto. And even access V8 internals with v8 or run code in a different V8 context with vm.
We can run other processes (child_process module), retrieve our own application’s process information using the process global variable.
We can bind to native code (e.g. run components built in C/C++). Node.js provides support for implementing native modules via the N-API interface.
Notably, we still need native code to access low-level features like communicating with hardware drivers or with hardware ports (e.g. USB or serial).
Even though V8 is fast at executing JS, there’s still a performance penalty to pay compared to executing native code. This is not often an issue today, but it can matter in various cases, so being able to delegate is nice.
Most JS VMs (and Node.js) supports Wasm.
2. The Module System
Node.js currently comes with both the CJS and ESM module systems.
The need for modules
- Split the codebase into multiple files
- Allow code reuse across projects
- Encapsulation
- Managing dependencies
CommonJS modules
Building a basic version of CommonJS from scratch.
Recall that CommonJS uses require, exports, and module.exports.
function loadModule(filename, module, require) {
    const wrappedSrc = `(function (module, exports, require) {
        ${fs.readFileSync(filename, "utf8")}
    })(module, module.exports, require)`;
    eval(wrappedSrc);
}
Generally don’t use the synchronous version of the fs APIs, but it makes sense here. Loading modules in CJS are deliberately synchronous operations. So if we import multiple modules, they (& their dependencies) are loaded in the right order.
And use eval with extreme care.
function require(moduleName) {
    console.log(`Require invoked for module ${moduleName}`);
	// Resolve full path of module, which we call `id`
    const id = require.resolve(moduleName);
	// Cache hit
    if (require.cache[id]) {
        return require.cache[id].exports;
    }

	// If we've never loaded it before, set up the environment for the first load.
    const module = {
		// Will be populated by the code of the omdule to export its public API
        exports: {},
        id,
    };

	// Cache the `module` object
    require.cache[id] = module;

	// Read module source code from its file & evalute
	// The module exports its public API by manipulating or replacing `module.exports`
    loadModule(id, module, require);

	// Return the public API to the caller
    return module.exports;
}

require.cache = {};
require.resolve = (moduleName) => {
    /* Resolve a full module id from the moduleName */
};
Defining a module:
const dependency = require('./aModule.js');

function log() {
    console.log(`Nice, ${dependency.username}!`);
}

module.exports.run = () => {
    log();
}
Everything in the module, except what’s assigned to module.exports, is private.
Since require is synchronous (both in our implementation and in the original), any assignment to module.exports must be synchronous as well.
Therefore, we are limited to mostly synchronous code as we define modules.
And this is why the core Node.js libraries offer synchronous APIs as alternative to most of the asynchronous ones.
We can define and export and uninitialized module that is initialized asynchronously at a later time. But loading such a module with require doesn’t guarantee that it’s ready to be used.
Dependency hell is a situation whereby two or more dependencies of a program in turn depend on a shared dependency, but require different incompatible versions.
Node.js solves this by loading a different version of a module depending on where the module is loaded from.
Module definition patterns
Named exports
// logger.js
exports.info = (message) => {
	console.log(`info: ${message}`);
}

exports.verbose = (message) => {
	console.log(`verbose: ${message}`);
}

// main.js
const logger = require('./logger');
logger.info('Informational message');
logger.verbose('Verbose message');
But the CJS specification only allows the use of exports to expose public members.
The use of module.exports is an extension by Node.js to support a broader range of module definition patterns.
The substack pattern: reassigning the entire module.exports to a function. You expose a single functionality, so there’s a clear entry point.
You can extend the pattern by using the exported function as a namespace for other public APIs.
// logger.js
module.exports = (message) => {
	console.log(`info: ${message}`);
}

module.exports.verbose = (message) => {
	console.log(`verbose: ${message}`);
}

// main.js
const logger = require('./logger');
logger('informational');
logger.verbose('verbose message');
You can also export a class. This lets the user create new instances themselves, as well as extend the prototype and create new classes.
And you can export an interface. You can define a stateful instances created from a constructor or factory, to be shared across modules. E.g. you have a class in logger.js defining a logger class, and then you create an instance thereof that you export.
Monkey patching is another pattern you can use. Here, your module modifies other modules or objects in the global scope. It generally refers to modifying the existing objects at runtime to change or extend their behavior or to apply temporary fixes.
Example:
// patcher.js
require('./logger').customMessage = function() {
	console.log('new functionality');
}

// main.js
require('./patcher');
const logger = require('./logger');
logger.customMessage();
Using this method has obvious side effects, so use it with care.
ESM: ECMAScript modules
ES modules are static, meaning the imports are described at the top level of every module & outside any control flow statement.
This poses some limitations, but also opens for some interesting scenarios not possible with the dynamic nature of CJS.
E.g. static imports let you do static analysis of the dependency tree, allowing for optimizations like dead code elimination (tree shaking) and more.
To use ESM in Node.js, either use the .mjs extension on your JS files, or add "type": "module"to the nearest parent package.json file in your project.
// logger.js
export function log(message) {
	console.log(message);
}

// main.js
// Using the * syntax is called 'namespace import'
import * as loggerModule from './logger.js';
console.log(loggerModule);
With namespace import, you import all members of the module and assign them to a local variable. But usually you just import a few entities from a module.
ESM has default exports, in which case the exported entity is registered under the name default (and not its given name). The default exported name is handled as a special case.
Default exports can make it harder to apply dead code elimination (tree shaking). For example, if a module only provides a default export, but all the functionality is exposed as properties of the exported object, bundlers will consider the entire object being used, and won’t eliminate unused code from it.
It’s usually best to just stick with named exports, especially when you want to expose more than one functionality. E.g. only use default exports when it’s one clear functionality you want to export.
ES modules have async imports (also called dynamic imports). These can be performed at runtime with the import() operator. It’s like a function that takes a module identifier as an argument & returns a promise that resolves to a module object.
3. Callbacks and Events
The Callback pattern
Callbacks are the materialization of the handlers of the Reactor pattern.
Synchronous or asynchronous?
Synchronous I/O is discouraged in Node.js, but can be the easiest and most efficient solution in some cases. Try to avoid blocking the event loop.
A good case for using the synchronous blocking API is when loading a configuration file during startup.
You can guarantee asynchronicity with deferred execution. For that, you schedule the synchronous callback invocation to be executed in the future instead of running it immediately in the same event loop cycle.
You can use process.nextTick(), which defers the execution of a function after the currently running operation completes: it pushes a given callback to the top of the event queue, in front of any pending I/O event, and returns immediately. The callback is invoked as soon as the currently running operation yields control back to the event loop.
import { readFile } from 'node:fs';

const cache = new Map();

function consistentReadAsync(fileName, callback) {
    if (cache.has(fileName)) {
        process.nextTick(() => callback(cache.get(fileName)));
    } else {
        readFile(fileName, 'utf8', (err, data) => {
            cache.set(fileName, data);
            callback(data);
        });
    }
}
setImmediate() can also defer the execution of code, but its semantics are different from process.nextTick().
Callbacks that are deferred with process.nextTick() are called microtasks. These are executed just after the current operation completes, before any other I/O event is fired.
With setImmediate(), on the other hand, the execution is queued in an event loop phase that comes after all I/O events have been processed.
Using nextTick invokes the callback faster, but can lead to I/O starvation (e.g. due to recursion) where scheduled I/O callbacks are delayed indefinitely. This doesn’t happen with setImmediate.
setTimeout(callback, 0) has similar behavior to setImmediate, but typically the callbacks scheduled with setImmediate are executed faster than those scheduled with setTimeout.
Node.js callback conventions
- The callback comes last: when a function accepts a callback, it’s the last argument.
- Any error always comes first:
(err, data) => {}, whereerrisnull/undefinedif the operation succeeds. - Propagating errors: proper error propagation is done by passing the error to the next callback in the chain.
- Uncaught exceptions: program exits with a non-zero exit code, and prints stack trace to
stderr.- Remember that wrapping a function that takes a callback with a try-catch does not catch errors that occurred in the callback
function readJSONThrows(filename, callback) {
    readFile(filename, 'utf8', (err, data) => {
        if (err) {
            return callback(err);
        }
        callback(null, JSON.parse(data));
    });
}

try {
    readJSONThrows('invalid_json.json', err => console.error(err));
} catch (err) {
    console.log("This won't catch the JSON parsing exception");
}
You can catch any uncaught exception with
process.on('uncaughtException', err => {
	// ...

	// Without this, the application would continue.
	process.exit(1)
});
The application state is not guaranteed to be consistent after uncaught exceptions, so make sure it exits immediately after uncaught exceptions—don’t omit the exit.
This is fail-fast and is the recommended practice.
The Observer pattern
import { EventEmitter } from 'node:events';

const emitter = new EventEmitter();
on(event, listener): register a new listener for the given event typeonce(event, listener): registers a new listener, but removes it after the event is emitted for the first timeemit(event, [arg1], [...]): produces a new event & provides additional arguments to be passed to the listenersremoveListener(event, listener): removes listener for the specified event type
listener has the signature function([arg1], [...]).
Like with callbacks, EventEmitter can’t throw an exception when an error condition occurs. The convention is to emit an error event and pass an Error object as an argument.
The error event is propagated in a special way. It automatically throws an exception and exits the application if such an event is emitted and no associated listener is found.
It’s important to unsubscribe listeners when they are no longer needed.
This lets us release the memory used by the objects in the listener’s scope & prevent memory leaks.
When to use the EventEmitter vs. callbacks?
Use callbacks when a result needs to be returned in an asynchronous way.
Use events when there is a need to communicate that something has happened.
But sometimes you want to use both.
For example, like glob does, by providing a callback for when it has found all files, but emits a match event when it finds one matching file.
4. Asynchronous Control Flow Patterns with Callbacks
Avoid callback hell, which is deeply nested callbacks in asynchronous code, leading to complex, hard-to-read, and difficult-to-maintain code structures.
Don’t abuse in-place function definitions when defining callbacks.
Basic principles to keep nesting level low & improve code structure:
- Exit as soon as possible (using
return,continue, orbreak) to immediately exit the current statement instead of writing (and nesting)if...elsestatements. - Create named functions for callbacks. Keep them out of closures. Pass intermediate results as arguments.
- Modularize the code.
Use libraries like async (opens in a new tab).
5. Asynchronous Control Flow Patterns with Promises and Async/Await
Promises
A Promise is an object that embodies the eventual result or error of an asynchronous operation.
A promise is pending when the operation isn’t yet complete, fulfilled when it successfully completes, and rejected if it terminates with an error.
When a Promise is either fulfilled or rejected, it’s settled.
Static methods on Promise:
Promise.resolve(obj): Creates a newPromisefrom anotherPromise, a thenable, or a value. Given aPromise, it’s returned as-is. If thenable, convert to promise. If value, then thePromiseis fulfilled with that value.Promise.reject(err): Creates aPromisethat rejects witherras the reasonPromise.all(iterable): Creates aPromisethat fulfills with an array of fulfillment values when every item in theiterable(e.g. an array) object fulfills. If anyPromisein it fails, thePromisereturned byallrejects with the first rejection reason.Promise.allSettled(iterable): Similar to above but waits for all of them to be settled. Doesn’t just fail when onePromisewithin fails.Promise.race(iterable): Returns aPromisethat’s equivalent to the firstPromiseiniterablethat settles.
And the main methods of Promise are then, catch, and finally.
Async/await
It’s recommended over promises but doesn’t replace them entirely.
Async/await is more readable. And it makes error handling a lot easier.
Producer-Consumer task queue with async/await, in TypeScript:
export class TaskQueuePC<TResult> {
	private taskQueue: Array<() => Promise<TResult>> = [];
	private consumerQueue: Array<
		(
			value: (() => Promise<TResult>) | PromiseLike<() => Promise<TResult>>,
		) => void
	> = [];

	constructor(concurrency: number) {
		for (let i = 0; i < concurrency; i++) {
			this.consumer();
		}
	}

	private async consumer(): Promise<void> {
		while (true) {
			try {
				const task = await this.getNextTask();
				await task();
			} catch (err) {
				console.error(err);
			}
		}
	}

	private async getNextTask(): Promise<() => Promise<TResult>> {
		return new Promise<() => Promise<TResult>>((resolve) => {
			if (this.taskQueue.length !== 0) {
				return resolve(this.taskQueue.shift() as () => Promise<TResult>);
			}

			// Postpone resolving by queueing the resolve callback into the consumerQueue
			// This effectively puts the Promise, and the consumer awaiting it, to sleep
			this.consumerQueue.push(resolve);
		});
	}

	public runTask(task: () => Promise<TResult>): Promise<TResult> {
		return new Promise<TResult>((resolve, reject) => {
			// When executed, the wrapper runs the input task & forwards the status of the Promise
			// returned by the task() to the outer Promise returned by runTask.
			const taskWrapper = () => {
				const taskPromise = task();
				taskPromise.then(resolve, reject);
				return taskPromise;
			};

			// If consumerQueue isn't empty, there's at least one consumer asleep, waiting for a new task.
			if (this.consumerQueue.length !== 0) {
				// So we extract the first consumer from the queue (the resolve callback of the Promise from getNextTask)
				const consumer = this.consumerQueue.shift();
				// And invoke it immediately by passing our taskWrapper
				if (consumer !== undefined) {
					consumer(taskWrapper);
				}
			} else {
				// If all consumers are busy, push the taskWrapper to the taskQueue
				this.taskQueue.push(taskWrapper);
			}
		});
	}
}

const CONCURRENCY = 3;
const taskQueue = new TaskQueuePC(CONCURRENCY);

// Example tasks
const task1 = async () => {
	console.log("Task 1 started");
	await new Promise((resolve) => setTimeout(resolve, 1000)); // Simulate async work
	console.log("Task 1 completed");
};

const task2 = async () => {
	console.log("Task 2 started");
	await new Promise((resolve) => setTimeout(resolve, 500)); // Simulate async work
	console.log("Task 2 completed");
};

const task3 = async () => {
	console.log("Task 3 started");
	await new Promise((resolve) => setTimeout(resolve, 2000)); // Simulate async work
	console.log("Task 3 completed");
};

taskQueue.runTask(task1);
taskQueue.runTask(task2);
taskQueue.runTask(task3);
6. Coding with Streams
Discovering the importance of streams
In an event-based platform (like Node.js), the most efficient way to handle I/O is in real time, consuming the input as soon as it’s available and sending the output as soon as the application produces it.
Buffering versus streaming
Buffer mode: for input operations, causes all the data coming from a resource to be collected into a buffer until the operation is completed, then the data is passed back to the caller as a single blob of data.
With streaming, however, you process the data as soon as it arrives from the resource.
Streams are more efficient in terms of both space and time.
And in Node.js, they’re composable.
Spatial Efficiency
Imagine having to read a massive file.
Using an API that just returns a massive buffer when the file is read entirely is not a great idea.
If you were to read multiple of these files concurrently, your application easily runs out of memory.
And buffers in V8 are limited in size, so you’d hit a wall before even running out of physical memory.
Gzip with streams (omits error handling):
import { createReadStream, createWriteStream } from "node:fs";
import { createGzip } from "node:zlib";

const fileName = process.argv[2];

createReadStream(fileName)
	.pipe(createGzip())
	.pipe(createWriteStream(`${fileName}.gz`))
	.on("finish", () => console.log("File successfully compressed"));
Time Efficiency
Case: app compresses file and uploads it to a remote HTTP server, which, in turn, decompresses it and saves it on the filesystem.
If you didn’t use streams, the upload would first start when the file had been read and compressed.
But with streams, you can read, compress, and upload at the same time.
Server code (receive.js)
import { createServer } from "node:http";
import { createWriteStream } from "node:fs";
import { createGunzip } from "node:zlib";
import { basename, join } from "node:path";

const server = createServer((req, res) => {
	const fileName = basename(req.headers["x-filename"]);
	const destFilename = join("received_files", fileName);
	console.log(`File request received: ${fileName}`);
	req
		.pipe(createGunzip())
		.pipe(createWriteStream(destFilename))
		.on("finish", () => {
			res.writeHead(201, { "Content-Type": "text/plain" });
			res.end("OK\n");
			console.log(`File saved: ${destFilename}`);
		});
});


server.listen(3000, () => console.log(`Listening on http://localhost:3000`));
Client code (client.js)
import { request } from "node:http";
import { createGzip } from "node:zlib";
import { createReadStream } from "node:fs";
import { basename } from "node:path";

const filename = process.argv[2];
const serverHost = process.argv[3];

const httpRequestOptions = {
	hostname: serverHost,
	port: 3000,
	path: "/",
	method: "PUT",
	headers: {
		"Content-Type": "application/octet-stream",
		"Content-Encoding": "gzip",
		"X-Filename": basename(filename),
	},
};

const req = request(httpRequestOptions, (res) => {
	console.log(`Server response: ${res.statusCode}`);
});

createReadStream(filename)
	.pipe(createGzip())
	.pipe(req)
	.on("finish", () => {
		console.log("File successfully sent.");
	});
Run the server first: node receive.js
And then the client with whatever file you want to test with: node client.js biome.json localhost.
We’re using streams to read the data from the file, then compressing and sending each chunk as soon as it’s read from the filesystem.
[Client]Read from the filesystem[Client]Compress the data[Client]Send it to the server[Server]Receive from the client[Server]Decompress the data[Server]Write the data to disk
With steams, we don’t have to do each step to completion before moving on.
It just starts with the first chunk, instead of waiting for the entire file to be read.
And when the next chunk of data is available, it doesn’t wait for the previous set of tasks to finish. Instead, it launches another ‘assembly line’ in parallel. Each task that we execute is asynchronous, so it can be parallelized by Node.js.
The only constraint is that the order in which chunks arrive in each stage must be preserved, which Node.js takes care of for us.
Composability
We can compose streams with pipe(), as seen in the sections above.
Essentially, we connect the different processing units, each being responsible for a single functionality. This is possible because streams have a uniform interface, and they understand each other in terms of API.
All that’s needed is for the data coming out of one stream fits the next stream.
We can even add encryption to the previous example:
Server:
import { createDecipheriv, randomBytes } from 'node:crypto';
import { createServer } from "node:http";
import { createWriteStream } from "node:fs";
import { createGunzip } from "node:zlib";
import { basename, join } from "node:path";

const secret = randomBytes(24);

console.log(`Generated secret: ${secret.toString('hex')}`);

const server = createServer((req, res) => {
	const fileName = basename(req.headers["x-filename"]);
    const iv = Buffer.from(req.headers['x-initialization-vector'], 'hex');
	const destFilename = join("received_files", fileName);
	console.log(`File request received: ${fileName}`);
	req
        .pipe(createDecipheriv('aes192', secret, iv))
		.pipe(createGunzip())
		.pipe(createWriteStream(destFilename))
		.on("finish", () => {
			res.writeHead(201, { "Content-Type": "text/plain" });
			res.end("OK\n");
			console.log(`File saved: ${destFilename}`);
		});
});


server.listen(3000, () => console.log(`Listening on http://localhost:3000`));
Client
import { createCipheriv, randomBytes } from "node:crypto";
import { request } from "node:http";
import { createGzip } from "node:zlib";
import { createReadStream } from "node:fs";
import { basename } from "node:path";

const filename = process.argv[2];
const serverHost = process.argv[3];
const secret = Buffer.from(process.argv[4], "hex");
const iv = randomBytes(16);

const httpRequestOptions = {
	hostname: serverHost,
	port: 3000,
	path: "/",
	method: "PUT",
	headers: {
		"Content-Type": "application/octet-stream",
		"Content-Encoding": "gzip",
		"X-Filename": basename(filename),
		"X-Initialization-Vector": iv.toString("hex"),
	},
};

const req = request(httpRequestOptions, (res) => {
	console.log(`Server response: ${res.statusCode}`);
});

createReadStream(filename)
	.pipe(createGzip())
	.pipe(createCipheriv("aes192", secret, iv))
	.pipe(req)
	.on("finish", () => {
		console.log("File successfully sent.");
	});
And run with basically the same command, except you grab the secret from the server and pass that as an argument when running the client.
I was interested in how I might implement this with Go, so here’s a shot at it. My interest in stream processing is not limited to Node.js. :)
Server (server.go):
package main

import (
	"compress/gzip"
	"crypto/aes"
	"crypto/cipher"
	"crypto/rand"
	"encoding/hex"
	"fmt"
	"io"
	"net/http"
	"os"
	"path/filepath"
)

func main() {
	// Generate a random 24-byte secret key
	secret := make([]byte, 24)
	if _, err := rand.Read(secret); err != nil {
		panic(err)
	}
	fmt.Printf("Generated secret: %s\n", hex.EncodeToString(secret))

	http.HandleFunc("/", func(w http.ResponseWriter, r *http.Request) {
		// Get the filename and IV from headers
		fileName := filepath.Base(r.Header.Get("X-Filename"))
		ivHex := r.Header.Get("X-Initialization-Vector")
		iv, err := hex.DecodeString(ivHex)
		if err != nil {
			http.Error(w, "Invalid IV", http.StatusBadRequest)
			return
		}
		destFilename := filepath.Join("received_files", fileName)
		fmt.Printf("File request received: %s\n", fileName)

		// Create AES cipher block and CFB decrypter
		block, err := aes.NewCipher(secret)
		if err != nil {
			http.Error(w, "Server error", http.StatusInternalServerError)
			return
		}
		stream := cipher.NewCFBDecrypter(block, iv)
		decryptReader := &cipher.StreamReader{S: stream, R: r.Body}

		// Decompress the decrypted data
		gzipReader, err := gzip.NewReader(decryptReader)
		if err != nil {
			http.Error(w, "Invalid gzip data", http.StatusBadRequest)
			return
		}
		defer gzipReader.Close()

		// Write the data to the destination file
		outFile, err := os.Create(destFilename)
		if err != nil {
			http.Error(w, "Server error", http.StatusInternalServerError)
			return
		}
		defer outFile.Close()

		if _, err := io.Copy(outFile, gzipReader); err != nil {
			http.Error(w, "Error writing file", http.StatusInternalServerError)
			return
		}

		// Send a success response
		w.WriteHeader(http.StatusCreated)
		w.Header().Set("Content-Type", "text/plain")
		w.Write([]byte("OK\n"))
		fmt.Printf("File saved: %s\n", destFilename)
	})

	fmt.Println("Listening on http://localhost:3000")
	http.ListenAndServe(":3000", nil)
}
Client (client.go):
package main

import (
	"compress/gzip"
	"crypto/aes"
	"crypto/cipher"
	"crypto/rand"
	"encoding/hex"
	"fmt"
	"io"
	"net/http"
	"os"
	"path/filepath"
)

func main() {
	if len(os.Args) < 4 {
		fmt.Println("Usage: client filename serverHost secret")
		return
	}
	filename := os.Args[1]
	serverHost := os.Args[2]
	secretHex := os.Args[3]
	secret, err := hex.DecodeString(secretHex)
	if err != nil {
		fmt.Println("Invalid secret")
		return
	}

	// Generate a random IV
	iv := make([]byte, aes.BlockSize)
	if _, err := rand.Read(iv); err != nil {
		panic(err)
	}

	// Open the file to send
	file, err := os.Open(filename)
	if err != nil {
		fmt.Println("Error opening file:", err)
		return
	}
	defer file.Close()

	// Create a pipe to connect gzip and encryption
	pr, pw := io.Pipe()
	go func() {
		// Compress the file data
		gw := gzip.NewWriter(pw)
		if _, err := io.Copy(gw, file); err != nil {
			pw.CloseWithError(err)
			return
		}
		gw.Close()
		pw.Close()
	}()

	// Create AES cipher block and CFB encrypter
	block, err := aes.NewCipher(secret)
	if err != nil {
		fmt.Println("Error creating cipher:", err)
		return
	}
	stream := cipher.NewCFBEncrypter(block, iv)
	encryptReader := &cipher.StreamReader{S: stream, R: pr}

	// Prepare the HTTP request
	req, err := http.NewRequest("PUT", fmt.Sprintf("http://%s:3000/", serverHost), encryptReader)
	if err != nil {
		fmt.Println("Error creating request:", err)
		return
	}
	req.Header.Set("Content-Type", "application/octet-stream")
	req.Header.Set("Content-Encoding", "gzip")
	req.Header.Set("X-Filename", filepath.Base(filename))
	req.Header.Set("X-Initialization-Vector", hex.EncodeToString(iv))

	// Send the request
	client := &http.Client{}
	resp, err := client.Do(req)
	if err != nil {
		fmt.Println("Error sending request:", err)
		return
	}
	defer resp.Body.Close()

	// Handle the response
	fmt.Printf("Server response: %d\n", resp.StatusCode)
	if resp.StatusCode != http.StatusCreated {
		body, _ := io.ReadAll(resp.Body)
		fmt.Println("Error:", string(body))
	} else {
		fmt.Println("File successfully sent.")
	}
}
Getting started with streams
Every stream in Node.js is an implementation of one of the four abstract base classes in the stream module: Readable, Writable, Duplex, Transform.
Each is also an instance of EventEmitter. They produce an end event when done reading, finish when a Writable stream has completed writing, or an error when something goes wrong.
Streams support two operating modes:
- Binary mode for streaming data in chunks, like buffers or strings
- Object mode for streaming data as a sequence of discrete objects. This allows us to use almost any JS value
Readable streams
Represents a source of data.
Two approaches to receiving data from a Readable stream: non-flowing (or paused) and flowing.
Non-flowing mode is the default. You attach a listener to the stream for the readable event, which signals the availability of new data to read.
Then, in a loop, read the data continuously until the internal buffer is emptied.
Can use the read method for this, which synchronously reads from the internal buffer & returns a Buffer object for the chunk of data.
process.stdin
	.on("readable", () => {
		let chunk;
		console.log("New data available");
		while ((chunk = process.stdin.read()) !== null) {
			console.log(`Chunk read (${chunk.length} bytes): "${chunk.toString()}"`);
		}
	})
	.on("end", () => {
		console.log("End of stream");
	});
Try with: cat <file> | node read-stdin.js.
With Readable streams in binary mode, you can read strings instead of buffers by calling setEncoding(encoding) on the stream & providing a valid encoding format (e.g. utf8). This is recommended fro streaming UTF-8 data as the stream will properly handle multibyte characters.
With flowing mode, you read from the stream by attaching a listener to the data event. This switches the stream to flowing mode, where data isn’t pulled with read, but pushed to the data listener as soon as it arrives.
process.stdin
	.on("data", (chunk) => {
		console.log("New data available");
        console.log(`Chunk read (${chunk.length} bytes): "${chunk.toString()}"`);
	})
	.on("end", () => {
		console.log("End of stream");
	});
It’s less flexible than non-flowing mode: you can’t control the flow of data.
You can also enable this mode by explicitly invoking the resume() method.
And you can stop the stream from emitting data events with the pause() method (then incoming data is cached in an internal buffer). This switches the stream back to non-flowing mode.
Readable streams are async iterators, so you could do:
async function main() {
	for await (const chunk of process.stdin) {
		console.log("New data available");
		console.log(`Chunk read (${chunk.length} bytes): "${chunk.toString()}"`);
	}

	console.log("End of stream");
}

main();
The function consumes an entire Readable stream and returns a Promise.
To implement a Readable stream, create a new class inheriting from Readable.
It must provide an implementation of _read(), with the signature readable._read(size). This method is not for consumers of the class (indicated by the _).
The internals of Readable calls the _read() method, which, in turn, starts to fill the internal buffer using push().
A stream that generates random strings (requires chance npm package):
import { Readable } from "node:stream";
import Chance from "chance";

const chance = new Chance();

export class RandomStream extends Readable {
	constructor(options) {
		super(options);
		this.emittedBytes = 0;
	}

	_read(size) {
		// Generate random string of length `size`
		const chunk = chance.string({ length: size });
		// We're pushing strings, so we specify the encoding
		this.push(chunk, "utf8");
		this.emittedBytes += chunk.length;
		// Terminates the stream randomly with likelihood 5%
		if (chance.bool({ likelihood: 5 })) {
			// Indicates EOF / end of stream
			this.push(null);
		}
	}
}


async function main() {
    const rs = new RandomStream();
    for await (const chunk of rs) {
        console.log(chunk.toString());
    }

    console.log("done")
}

main();
The options object takes parameters for the stream. You can set encoding, which is used to convert buffers to strings (default is null), enable object mode with objectMode, or set the upper limit of data stored in the internal buffer with highWaterMark (default 16KB).
The size in _read is an advisory parameter. It’s good to honor it and only push the amount of data requested by the caller, but it isn’t mandatory to do so.
You should check whether push returns false. If that happens, the internal buffer of the receiving stream has reached the highWaterMark limit and we should stop adding more data to it (backpressure).
You don’t have to create a stream with a custom class. You can use the simplified construction approach, wherein you just invoke new Readable(options) and pass a method named read() in the set of options. This has the same semantic as the _read() method when defining the class.
Here’s the same random stream class with this approach:
let emittedBytes = 0;
const randomStream = new Readable({
	read(size) {
		const chunk = chance.string({ length: size });
		this.push(chunk, "utf8");
		emittedBytes += chunk.length;
		if (chance.bool({ likelihood: 5 })) {
			this.push(null);
		}
	},
});
This is great when you don’t need to manage a complicated state.
You can easily create Readable stream instances from arrays or other iterable objects using Readable.from(). This sets objectMode to true by default.
Writable streams
Represents a data destination. E.g. a file on a filesystem, a database table, stderr or stdout.
To write to a stream, just use the write method. And when you know no more data will be written to the stream, call the end method. You can provide a final chunk through end.
A server that outputs a random sequence of strings:
import { createServer } from "node:http";
import Chance from 'chance';

const chance = new Chance();
const server = createServer((req, res) => {
    res.writeHead(200, { "Content-Type": "text/plain" });
    while (chance.bool({ likelihood: 95 })) {
        res.write(`${chance.string()}\n`);
    }

    res.end('\n\n');
    res.on('finish', () => console.log('All data sent'));
})


server.listen(8080, () => {
    console.log("Listening on http://localhost:8080");
});
res is an instance of http.serverResponse and is also a Writable stream.
Loop has a 5% chance of terminating. Inside it, we write a random string to the stream.
When we’re out of the loop, we call end on the stream to indicate no more data will be written. And we provide a final string with two newline characters.
Then we register a listener for the finish event, which is fired when all the data has been flushed to the underlying socket.
Backpressure: when data is written faster than the stream can consume it.
Streams use internal buffers to cope with incoming data. But if the stream doesn’t give any feedback to the writer, we may have buildup in the internal buffer, leading to large memory usage.
To prevent this, writable.write() returns false when the internal buffer exceeds the highWaterMark limit. This indicates that the application should stop writing. When the buffer is emptied, the drain event is emitted, indicating that it’s safe to start writing again.
While backpressure is an advisory mechanism, ignoring it can lead to indefinite buffer growth. You should respect it.
Here’s an example of how to handle it:
import { createServer } from "node:http";
import Chance from 'chance';

const chance = new Chance();
const server = createServer((req, res) => {
    res.writeHead(200, { "Content-Type": "text/plain" });

    function generateMore() {
        while (chance.bool({ likelihood: 95 })) {
            const randomChunk = chance.string({
				// Set high (16KB - 1 byte): close to default highWaterMark
                length: (16 * 1024) - 1
            });
            const shouldContinue = res.write(`${randomChunk}\n`);
            if (!shouldContinue) {
                console.log('Backpressure')
                return res.once('drain', generateMore);
            }
        }
        res.end('\n\n');
    }

    generateMore();
    res.on('finish', () => console.log('All data sent'));
})


server.listen(8080, () => {
    console.log("Listening on http://localhost:8080");
});
To implement a Writable stream, create a new class that inherits from Writable and implements _write().
As with Readable streams, there’s a similar simplified construction mechanism where you simply include a write method to the options object in new Writable(options).
Duplex streams
This is both Readable and Writable.
Useful for describing an entity that is both a data source and destination (e.g. network sockets). You can use both read and write here. Or listen to readable and drain events.
Transform streams
This is a special kind of Duplex stream, specifically designed to handle data transformations. For example, zlip.createGzip() and crypto.createCipheriv() create Transform streams for compression and encryption, respectively.
In simple Duplex streams, there is no immediate relationship between the data read from the stream and data written to it (stream is agnostic to it). Like a TCP socket, which just sends and receives data to and from the remote peer. The socket is not aware of any relationship between the input and output.
Transform streams apply a transformation to each chunk of data they receive from their Writable side, and then make the transformed data available on their Readable side.
To create a Transform stream, you have to fill in _transform() and _flush(), rather than _read() and _write().
Transform stream that replaces all occurrences of a given string:
import { Transform } from "node:stream";

export class ReplaceStream extends Transform {
	constructor(searchStr, replaceStr, options) {
		super({ ...options });
		this.searchStr = searchStr;
		this.replaceStr = replaceStr;
		this.tail = "";
	}

	_transform(chunk, encoding, callback) {
		const pieces = (this.tail + chunk).split(this.searchStr);
		const lastPiece = pieces[pieces.length - 1];
		const tailLen = this.searchStr.length - 1;
		this.tail = lastPiece.slice(-tailLen);
		pieces[pieces.length - 1] = lastPiece.slice(0, -tailLen);
		this.push(pieces.join(this.replaceStr));
		callback();
	}

	_flush(callback) {
		this.push(this.tail);
		callback();
	}
}
Searching in a buffer is trivial. It’s not so easy when the data is streaming, and possible matches might be distributed across multiple chunks.
Here’s how it works:
- Split the data in memory (
taildata and current chunk) usingsearchStras separator - Take the last item of the array generated by the operation and extract the last
searchString.length - 1characters. Save the result intail, which is prepended to the next chunk of data - All pieces resulting from split are joined together using
replaceStras a separator and pushed into the internal buffer
When the stream ends, we may have some content in tail that wasn’t pushed into the internal buffer. This is what _flush() is for. It’s invoked just before the stream is ended, and then we have a final chance to push remaining data before completely ending the stream.
I decided to rewrite the above because I thought it wasn’t as clear as it could be.
import { Transform } from "node:stream";

export class ReplaceStream extends Transform {
	constructor(searchStr, replaceStr, options) {
		super(options);
		this.searchStr = searchStr;
		this.replaceStr = replaceStr;
		this.buffer = "";
	}

	_transform(chunk, encoding, callback) {
		// Append incoming chunk to the buffer
		this.buffer += chunk.toString();

		let startIndex = 0;
		let index;

		// Find and replace all occurrences of searchStr in the buffer
		while ((index = this.buffer.indexOf(this.searchStr, startIndex)) > -1) {
			// Push data before the found searchStr
			this.push(this.buffer.slice(startIndex, index));
			// Push the replaceStr instead of searchStr
			this.push(this.replaceStr);
			// Move startIndex past the searchStr
			startIndex = index + this.searchStr.length;
		}

		// Keep any remaining data that could be part of a searchStr at the end
		this.buffer = this.buffer.slice(startIndex);
		callback();
	}

	_flush(callback) {
		// Push any remaining data in the buffer
		this.push(this.buffer);
		callback();
	}
}
It uses this.buffer to accumulate incoming data chunks to handle the case where searchStr might be split across two chunks.
It basically does the same as the other implementation, but is more straightforward to me.
Transform streams also support simplified construction.
Transform streams can be used to do many kinds of transformations. E.g. data filtering and data aggregation.
Filtering is easy: just use this.push conditionally in your Transform stream class.
Likewise with aggregation: just keep a variable in your class that you aggregate into. And then you don’t push anything until in the _flush method (but call cb in both flush and transform!).
PassThrough streams
This s a special type of Transform that outputs every data chunk without applying any transformation.
They’re great for e.g. observability, or implementing late piping and lazy streaming.
Observability example:
import { PassThrough } from "node:stream";

let bytesWritten = 0;
const monitor = new PassThrough();
monitor.on("data", (chunk) => {
	bytesWritten += chunk.length;
});

monitor.on("finish", () => {
	console.log(`${bytesWritten} bytes written.`);
});

monitor.write("Hello!");
monitor.end();
You can simply use the monitor in a pipe.
Late piping
E.g. you have an upload(filename, contentStream) API function to upload a file to a server, and you want to stream a file from your file system (via createReadStream from fs) to the contentStream so it gets uploaded, but also do some preprocessing.
Then you can create a PassThrough stream, pass that as the contentStream argument, and then pipe the results from createReadStream(fileName) into that. With that method, you can do any kind of preprocessing by inserting a pipe before you pipe into the contentStream.
So the PassThrough stream works as a placeholder for data that’ll be read or written in the future.
Lazy streams
Sometimes we want to create a large number of streams.
Let’s say we want to create a bunch of file reading streams.
That would likely get us an EMFILE, too many open files error (createReadStream from fs opens a file descriptor every time a new stream is created, even before you read from the streams).
Creating a stream instance might initialize expensive operations straight away (e.g. opening a file or socket, initializing a database connection, etc.), even before using the stream.
Then you may want to delay the expensive initialization until you actually need to use the stream.
The lazystream library can do that.
Connecting streams using pipes
Can connect Node.js streams with the pipe method of the Readable stream:
readable.pipe(writable, [options]);It takes the data emitted from the readable stream and pumps it to the provided writable stream. The writable stream is ended when readable is ended, unless {end:false} is specified as an option.
pipe() returns the writable stream passed in the first argument, so we can create chained invocations if such a stream is also Readable (e.g. Duples or Transform).
When you pipe two streams together, it creates suction, allowing data to flow automatically to the writable stream. So you don’t need to call read or write.
And you don’t need to control backpressure — it gets taken care of automatically.
If you want to handle errors from streams, you have to do it per stream:
stream1
	.on('error', () => {})
	.pipe(stream2)
	.on('error', () => {});
And if an error occurs, you need to destroy the stream(s) manually.
But there’s a better way, using the pipeline() helper function.
import { pipeline } from "node:stream";

pipeline(stream1, stream2, stream3, ..., cb);
It pipes every stream passed in the arguments list to the next one. For each, it also registers a proper error and close listeners. So all streams are properly destroyed if an error occurs.
The cb is a callback for when the stream finishes. If an error occurs, it’s called with the error as the first argument.
Asynchronous control flow patterns with streams
By default, streams handle data in sequence. E.g. a Transform stream’s _transform() doesn’t get invoked with the next chunk of data until the previous invocation is complete.
For example, concatenating a bunch of files into one file, respecting their order:
import { createWriteStream, createReadStream } from "node:fs";
import { Readable, Transform } from "node:steram";

export function concatFiles(dest, files) {
	return new Promise((resolve, reject) => {
		const destStream = createWriteStream(dest);
		Readable.from(files)
			.pipe(
				new Transform({
					objectMode: true,
					transform(filename, enc, done) {
						const src = createReadStream(filename);
						src.pipe(destStream, { end: false });
						src.on("error", done);
						src.on("end", done);
					},
				}),
			)
			.on("error", reject)
			.on("finish", () => {
				destStream.end();
				resolve();
			});
	});
}
But you can also do unordered parallel execution.
ParallelStream is the general pattern. I’m including the example of a URL status monitor as well.
import { createReadStream, createWriteStream } from "node:fs";
import { pipeline, Transform } from "node:stream";
import split from "split";

export class ParallelStream extends Transform {
	constructor(userTransform, opts) {
		super({ objectMode: true, ...opts });
		this.userTransform = userTransform;
		this.running = 0;
		this.terminateCb = null;
	}

	_transform(chunk, enc, done) {
		this.running++;
		this.userTransform(
			chunk,
			enc,
			this.push.bind(this),
			this._onComplete.bind(this),
		);
		done();
	}

	_flush(done) {
		if (this.running > 0) {
			this.terminateCb = done;
		} else {
			done();
		}
	}

	_onComplete(err) {
		this.running--;

		if (err) {
			return this.emit("error", err);
		}

		if (this.running === 0) {
			this.terminateCb?.();
		}
	}
}

pipeline(
	createReadStream(process.argv[2]), // path to file with URLs on each line
	split(), // `split` npm package
	new ParallelStream(async (url, enc, push, done) => {
		if (!url) {
			return done();
		}

		try {
			await fetch(url, {
				method: "HEAD",
				signal: AbortSignal.timeout(5000),
			});
			push(`${url} is up\n`);
		} catch (err) {
			push(`${url} is down\n`);
		}
		done();
	}),
	createWriteStream("results.txt"),
	(err) => {
		if (err) {
			console.error(err);
			process.exit(1);
		}

		console.log("All URLs have been checked.");
	},
);
This was so fast that I thought it hadn’t done anything.
You can also have unordered limited parallel execution.
E.g. if you tried the above URL status monitor on millions of URLs, you’d run into issues.
So we can implement LimitedParallelStream that takes a concurrency limit as input.
export class LimitedParallelStream extends Transform {
	constructor(concurrency, userTransform, opts) {
		super({ objectMode: true, ...opts });
        this.concurrency = concurrency;
		this.userTransform = userTransform;
		this.running = 0;
		this.terminateCb = null;
        this.continueCb = null;
	}

	_transform(chunk, enc, done) {
		this.running++;
		this.userTransform(
			chunk,
			enc,
			this.push.bind(this),
			this._onComplete.bind(this),
		);

		// Checking if we have free executing slots before we can invoke `doen()` & trigger the processing of the next item.
		// If we don't have enough slots, we just wait calling `done()` until a task finishes.
		if (this.running  < this.concurrency) {
            done();
        } else {
            this.continueCb = done;
        }
	}

	_flush(done) {
		if (this.running > 0) {
			this.terminateCb = done;
		} else {
			done();
		}
	}

	_onComplete(err) {
		this.running--;

		if (err) {
			return this.emit("error", err);
		}

		// When a task completes, invoked any saved cb to unblock the stream & trigger the processing of the next item.
        const tempCb = this.continueCb;
        this.continueCb = null;
        tempCb?.();

		if (this.running === 0) {
			this.terminateCb?.();
		}
	}
}
You can also, of course, get ordered parallel execution. The implementation is verbose, so use e.g. the parallel-transform npm package.
Piping patterns
Some possibilities:
- Merge the flow of two different streams into one
- Split the flow of one stream into two or more pipes
- Redirect the flow based on a condition
Combining is just taking some amount of streams and making it such that when you write into the combined stream, you’re writing to the first one, and when you’re reading from the combined stream, you’re reading from the last one.
It’s usually a Duplex stream, built by connecting the first stream to its writable side and the last stream to its readable side.
But we also need to capture and propagate all errors emitted from streams in the pipeline.
You can use an existing library, like pumpify.
Forking streams can be done by piping a single Readable stream into multiple Writable streams.
Merging streams is the opposite of forking. It involves piping a set of Readable streams into a single Writable stream.
When merging, pay attention to the way you handle the end event. It should be { end: false } when piping multiple sources to a single destination, and then invoking end() on the destination when all sources have completed reading.
There’s a variation of the merge stream pattern where we use a shared channel to deliver the data of a set of streams.
The source streams remain logically separated inside the shared channel, so we can split the stream once the data reaches the other end of the shared channel.
Combining multiple streams (also called channels in this case) is called multiplexing, while reconstructing the original streams from the data received from a shared stream is called demultiplexing.
The device that performs these actions is called a multiplexer (or mux) and a demultiplexer (demux), respectively.
Example of a multiplexer (the client) and demultiplexer (the server):
import { fork } from "node:child_process";
import { connect, createServer  } from "node:net";
import { createWriteStream } from "node:fs";

function multiplexChannels(sources, destination) {
	let openChannels = sources.length;
	for (let i = 0; i < sources.length; i++) {
		sources[i]
			.on("readable", function () {
				let chunk;
				while ((chunk = this.read()) !== null) {
					const outBuff = Buffer.alloc(1 + 4 + chunk.length);
					outBuff.writeUInt8(i, 0); // Channel ID
					outBuff.writeUint32BE(chunk.length, 1); // Packet size
					chunk.copy(outBuff, 5); // Data
					console.log(`Sending packet to channel: ${i}`);
					destination.write(outBuff); // Write packet to destination stream
				}
			})
			.on("end", () => {
				if (--openChannels === 0) {
					destination.end();
				}
			});
	}
}

function demultiplexChannel(source, destinations) {
    let currentChannel = null;
    let currentLength = null;

    source.on('readable', () => {
        let chunk;
        if (currentChannel === null) {
            chunk = source.read(1);
            currentChannel = chunk?.readUInt8(0);
        }

        if (currentLength === null) {
            chunk = source.read(4);
            currentLength = chunk?.readUInt32BE(0);

            if (currentLength === null){
                return null
            }
        }

        chunk = source.read(currentLength);
        if (chunk === null) {
            return null;
        }

        console.log(`Received packet from: ${currentChannel}`);
        destinations[currentChannel].write(chunk);
        currentChannel = null;
        currentLength = null;
    })
    .on('end', () => {
        destinations.forEach(destination => {
            destination.end();
        });
        console.log('Source channel closed');
    });
}


if (process.argv[2] === "client") {
    // Create TCP client connection to localhost:3000
    const socket = connect(3000, () => {
        const child = fork(
            process.argv[3],
            process.argv.slice(3),
            { silent: true }
        );

        multiplexChannels([child.stdout, child.stderr], socket);
    });
}

if (process.argv[2] === "server") {
    const server = createServer((socket) => {
        const stdoutStream = createWriteStream('stdout.log');
        const stderrStream = createWriteStream('stderr.log');
        demultiplexChannel(socket, [stdoutStream, stderrStream]);
    });

    server.listen(3000, () => { console.log('Server started'); })
}
Run with node logger.js <client|server>. If you’re running client, specify a file to run.
We can also do something similar to demultiplex more than a binary/text stream — we can make it work for objects.
8. Structural Design Patterns
Proxy
Logging Writable stream with Proxy:
import { createWriteStream } from "node:fs";
import type { Writable } from "node:stream";

export function createLoggingWritable(writable: Writable) {
	return new Proxy(writable, {
		get(target, key, receiver) {
			if (key === "write") {
				return (...args) => {
					const [chunk] = args;
					console.log("Writing", chunk);
					return target.write.apply(target, args);
				};
			}

			return target[key];
		},
	});
}

const writable = createWriteStream("test.txt");
const writableProxy = createLoggingWritable(writable);

writableProxy.write("First log entry\n");
writableProxy.write("Second log entry\n");
writableProxy.write("Third log entry\n");

writable.write("This is not logged\n");

writable.end();
Change observer with Proxy:
export function createObservable<T extends object>(
    target: T,
    observer: <K extends keyof T>(change: { prop: K; prev: T[K]; curr: T[K] }) => void
): T {
    const handler: ProxyHandler<T> = {
        set(obj: T, prop: PropertyKey, value: any, receiver: any): boolean {
            if (prop in obj) {
                const key = prop as keyof T;
                const prev = obj[key];
                if (prev !== value) {
                    obj[key] = value;
                    observer({ prop: key, prev, curr: value });
                }
            } else {
                // If the property doesn't exist on the target, add it
                (obj as any)[prop] = value;
            }
            return true;
        },
    };

    return new Proxy(target, handler);
}

function calculateTotal(invoice) {
    return invoice.subtotal - invoice.discount + invoice.tax;
}

const invoice = {
    subtotal: 100,
    discount: 10,
    tax: 20
};

let total = calculateTotal(invoice);
console.log(`Starting total: ${total}`);

const obsInvoice = createObservable(
    invoice,
    ({ prop, prev, curr }) => {
        total = calculateTotal(invoice);
        console.log(`TOTAL: ${total} (${prop} changed: ${prev} -> ${curr})`);
    }
);

obsInvoice.subtotal = 200;
obsInvoice.discount = 20;
obsInvoice.discount = 20;
obsInvoice.tax = 30;

console.log(`Final total: ${total}`);
9. Behavioral Design Patterns
Strategy
Lets an object (called the context) support variations in its logic by extracting the variable parts into separate, interchangeable objects called strategies.
Example: a config context with a variable serialization and deserialization. Makes it trivial to switch from JSON to INI, for example.
The State Pattern is a specialization of the Strategy pattern where the strategy changes depending on the state of the context.
Template
It’s similar to the Strategy Pattern.
It defines an abstract class that implements the skeleton (common parts) of a component where some of its steps are left undefined.
Subclasses then fill the gaps by implementing the missing parts, called template methods.
In JS, we don’t really have abstract classes, so we can leave the method undefined or assign it to a function that throws an exception.
Iterator
The Iterator Pattern defines a common interface or protocol for iterating the elements of a container (e.g. an array or tree).
Iterators also work with other types of constructs that aren’t necessarily containers, like event emitters and streams.
In JS, we implement this pattern through protocols.
The starting point is the iterator protocol, which defines an interface for producing a sequence of values.
We’ll call iterator an object implementing a next() method that: each time the method is called, the function returns the next element in the iteration through an object (called iterator result), having two properties—done and value.
done is true when the iteration is complete (no more elements to return). Otherwise it’s undefined or false.
value contains the current element. Can be undefined if done is true. If it’s set even when done is true, it’s said that value contains the return value of the iteration. That’s a value which is not part of the elements being iterated, but related to the iteration itself (e.g. time spent iterating, the average of all the iterated elements).
const A_CHAR_CODE = 65;
const Z_CHAR_CODE = 90;

function createAlphabetIterator() {
	let currCode = A_CHAR_CODE;

	return {
		next() {
			const currChar = String.fromCodePoint(currCode);
			if (currCode > Z_CHAR_CODE) {
				return { done: true };
			}

			currCode++;
			return { value: currChar, done: false };
		},
	};
}
The iterable protocol defines a standardized means for an object to return an iterator. Such objects are called iterables.
In JS, we can define an iterable by ensuring that it implements the @@iterator method, or in other words, a method accessible through the built-in symbol Symbol.iterator.
class MyIterable {
	// Other methods...
	[Symbol.iterator]() {
		// Return an iterator
	}
}
The reason for having these standards is such that we can use basic syntax constructs on them. It’ll just work with e.g. a for..of loop.
ES2015 introduced generators (also known as semicoroutines), which are closely related to iterators.
They are a generalization of standard functions, in which there can be different entry points.
A generator can be suspended (using yield) and then resumed at a later time.
Generators are well-suited to implement iterators—the generator object returned by a generator function is both an iterator and an iterable.
Defined with function*:
function* myGenerator() {
	// Generator body
}
When invoked, it returns a generator object. Invoking next() on the generator object will either start or resume the execution of the generator until the yield instruction is invoked, or the generator returns (either implicitly or explicitly with a return).
Using yield followed by a value x is equivalent to returning {done: false, value: x}, while returning a value x is equivalent to returning {done: true, value: x}.
Anything yielded in a generator can be iterated over with e.g. for..of loops. But if you return something, it won’t ‘count’ as done is true.
Generator objects’ next methods optionally accept an argument. This argument is passed as the return value of the yield instruction. So you can do e.g.:
function* twoWayGenerator() {
	const what = yield null;
	yield `Hello ${what}`;
}

const twoWay = twoWayGenerator();
twoWay.next();
console.log(twoWay.next("world"));
Generator objects also have throw and return iterator methods.
Async iterators are iterators that return a promise. We can use an async function to define the next() method of the iterator.
Async iterables are objects that implement an @@asyncIterator method (Symbol.asyncIterator).
These can be looped over using the await...of syntax.
There are also async generators. Just prepend async to a generator function definition.
Middleware
Middleware in Express: functions that process HTTP requests and responses in a pipeline..
Express popularized middleware in Node.js, allowing easy addition of features without expanding the core framework.
Express middleware function signature: function (req, res, next) { ... }
next is the callback to be invoked when the current middleware is done with its task & so we can trigger the next middleware.
Common middleware tasks: parsing request body, compression, logging, session management, CSRF protection.
The pattern is similar to Intercepting Filter and Chain of Responsibility patterns.
Key components: Middleware Manager and middleware functions.
Middleware Manager organizes and executes middleware functions.
Middleware executes in an asynchronous sequential flow.
Each middleware unit can stop further processing if needed.
Error handling often involves a separate middleware sequence.
There aren’t any strict rules for how you should be processing and propagating data in the pipeline. You can augment it with additional properties and functions or maintain immutability & always return fresh copies after processing.
It depends.
Command
A command is any object that encapsulates all the necessary information to perform an action at a later time.
10. Universal JavaScript for Web Applications
Tree shaking: an optimization technique for module bundlers. Keep track of the entities import from every module & the exported entities in the dependency graph. If there are any exported functionalities that aren’t used, they can get pruned from the final bundle.
11. Advanced Recipes
Running CPU-bound tasks
Using external processes:
import { fork, type ChildProcess } from "node:child_process";

export class ProcessPool {
	// Set of running processes ready to be used
	private pool: ChildProcess[] = [];
	// The list of processes currently being used
	private active: ChildProcess[] = [];
	// A queue of callbacks for all those requests that could not be fulfilled immediately due to the lack of an available process
	private waiting: Array<{
		resolve: (value: ChildProcess) => void;
		reject: (reason?: unknown) => void;
	}> = [];

	constructor(
		private file: string,
		private poolMax: number,
	) {}

	acquire(): Promise<ChildProcess> {
		return new Promise<ChildProcess>((resolve, reject) => {
			let worker: ChildProcess | undefined;

			// If there's a process available, use it
			if (this.pool.length > 0) {
				worker = this.pool.pop();
				if (worker) {
					this.active.push(worker);
					return resolve(worker);
				}

				return reject(new Error("Failed to acquire a worker from the pool"));
			}

			// Wait for a process to become available if we've exceeded the pool max
			if (this.active.length >= this.poolMax) {
				this.waiting.push({ resolve, reject });
				return;
			}

			// Create running process if we haven't reached max yet
			worker = fork(this.file);
			worker.once("message", (message: unknown) => {
				// Wait for 'ready' message from the newly launched process
				// Means it has started & is ready to accept new jobs
				if (message === "ready") {
					this.active.push(worker);
					return resolve(worker);
				}

				worker.kill();
				reject(new Error("Improper process start"));
			});

			worker.once("exit", (code: number | null) => {
				console.log(`Worker exited with code ${code}`);
				this.active = this.active.filter((w) => worker !== w);
				this.pool = this.pool.filter((w) => worker !== w);
			});
		});
	}

	// Release a worker to the pool once we're done with it
	release(worker: ChildProcess): void {
		// If there's a request waiting, reassign the worker we're releasing
		if (this.waiting.length > 0) {
			const waitingRequest = this.waiting.shift();
			if (waitingRequest) {
				waitingRequest.resolve(worker);
			}
		}

		// Otherwise, remove the worker we're releasing from the active list back to the pool
		this.active = this.active.filter((w) => worker !== w);
		this.pool.push(worker);
	}
}
Potential improvements:
- Terminate idle processes to free memory after some inactivity
- Mechanism to kill non-responsive processes / restarted crashed ones
You can use it by writing some worker hat expects to receive some input payload.
As an alternative option, you can also use worker threads (new Worker).
You can use e.g. workerpool (opens in a new tab) or piscina (opens in a new tab).
12. Scalability and Architectural Patterns
- Scalability is based on the principle of load distribution
- The “scale cube” model describes three dimensions of scalability, as described by Martin L. Abbott and Michael T. Fisher in The Art of Scalability. Three ways of scaling a monolithic application:
- X-axis: Cloning
- Y-axis: Decomposing by service/functionality
- Z-axis: Splitting by data partition
- X-axis scaling (Cloning):
- Most intuitive and inexpensive approach
- Involves creating multiple instances of the same application
- Each instance handles a fraction of the workload
- Y-axis scaling (Decomposing by service/functionality):
- Involves breaking down the application based on functionalities or services
- Creates separate, standalone applications with individual codebases
- Examples: separating admin and public-facing parts, or extracting authentication services
- Has significant impact on architecture and management
- Often associated with microservices
- Z-axis scaling (Splitting by data partition):
- Each instance is responsible for a portion of the data
- Similar to horizontal/vertical partitioning in databases
- Various ways to partition: list, range, hash, etc.
- Requires a lookup step to determine which instance handles specific data
- Primarily used at the data storage level
- Should be considered only after X and Y axes are fully exploited
- X-axis and Y-axis scaling are the most common and effective techniques for Node.js applications
Cloning and Load Balancing
The cluster module
A simple pattern to distribute the load of an application across instances on a single machine is by using the cluster module (part of core library).
cluster simplifies the forking of new instances of the same application and automatically distributes incoming connections across them.
A primary process spawns a number of workers, each representing an instance of the app we’re scaling.
In most systems, cluster uses an explicit round-robin load balancing algorithm.
import { createServer } from "node:http";
import { cpus } from "node:os";
import cluster from "node:cluster";

if (cluster.isPrimary) {
    const availableCpus = cpus();
    console.log(`Clustering to ${availableCpus.length} processes`);
    for (const cpu of availableCpus) {
        cluster.fork();
    }

    cluster.on('exit', (worker, code) => {
        if (code !== 0 && !worker.exitedAfterDisconnect) {
            console.log(
                `Worker ${worker.process.pid} crashed. ` +
                'Starting a new worker.'
            );
            cluster.fork();
        }
    })
} else {
    const { pid } = process;
    const server = createServer((req, res) => {
        let i=1e7;while(i>0){i--};
        console.log(`Handling request from ${pid}`);
        res.end(`Hello from ${pid}\n`);
    });

    server.listen(8080, () => console.log(`Started at ${pid}`));
}
How can we implement zero-downtime restart?
By restarting the workers one at a time. Just add this to the above, in the isPrimary block:
process.on('SIGUSR2', async () => {
	const workers = Object.values(cluster.workers);
	for (const worker of workers) {
		console.log(`Stopping worker: ${worker.process.pid}`);
		worker.disconnect();
		await once(worker, 'exit');
		if (!worker.exitedAfterDisconnect) continue;
		const newWorker = cluster.fork();
		await once(newWorker, 'listening');
	}
});
Dealing with stateful communications
cluster doesn’t work well with stateful communications where the application state isn’t shared between the various instances. E.g. different requests belonging to the same stateful session may be handled by a different instance of the application.
One way to handle it is sharing the state across multiple instances. You can do this with a shared datastore. But that may take a lot of refactoring if you didn’t build with it in mind.
Sticky load balancing
Sticky load balancing is a way to have the load balancer always route all requests associated with a session to the same instance of the application.
But a problem with sticky load balancing is that it nullifies most of the advantage of having a redundant system, where all instances of the application are the same, and where an instance can eventually replace another one that stopped working.
So avoid sticky load balancing and instead opt for building apps that maintain session state in a shared store. Or apps that don’t require stateful communications at all (e.g. by building it into the request itself).
Scaling with a reverse proxy
Instead of using cluster, you can also just start multiple standalone instances of the same application running on different ports or machines & then use a reverse proxy (or gateway) to provide access to them. It can also distribute the load between the instances.
Like Nnginx or HAProxy.
Notably, this also works across machines, not just processes.
You’ll need a dedicated supervisor to ensure automatic restart in case of a crash. There are Node.js-based supervisors like forever and pm2, or OS-based ones like systemd or runit.
And monit or supervisord, Kubernetes, Nomad, or Docker Swarm.
Dynamic horizontal scaling
An advantage of modern cloud-based infra is that you can dynamically adjust the capacity of your app based on current or predicted traffic. This is called dynamic scaling.
This requires your load balancer to always be up-to-date with the current network topology, knowing at any time which server is up.
A common pattern to solve that problem is to use a central repository called a service registry, which keeps track of the running servers and the services they provide.
For this to work in complete automation, each app has to register itself to the service registry when it comes online and unregister itself when it stops.
Scaling applications using containers
Kubernetes is useful for when we need a more complex system than Docker alone that allows us to orchestrate all the running container instances over the available machines in our cloud cluster. It’s a container orchestration tool.
With such a tool, we can:
- Join multiple cloud servers (nodes) into one logical cluster, where we can add and remove nodes dynamically without affecting the availability of the services running in every node
- Ensure no downtime – if a container instance stops or becomes unresponsive, it is automatically restarted. And if a node in a cluster fails, the workload running in that node is automatically reassigned to another node
- Helps implement service discovery and load balancing
- Get orchestrated access to durable storage so data can be persisted as needed
- Get automated rollouts and rollbacks of apps with zero downtime
- Secret storage for sensitive data & configuration management systems
Kubernetes configuration revolves around objects.
An object is an element in your cloud deployment, which can be added, removed, or have its configuration changed over time.
Objects could be containerized apps, resources for containers (CPU and memory allocations, persistent storage, access to devices like network interfaces or GPU, etc.), policies for app behavior (restart policies, upgrades, fault tolerance).
A Kubernetes object is like a record of intent, meaning once you create one, Kubernetes will constantly monitor (and change, if necessary) the state of the object to ensure it stays compliant with the defined expectation.
Decomposing complex applications
Following the Y-axis of the scale cube (decomposing by service/functionality), we can break the application into its essential components, creating separate, independent applications.
We simply avoid writing big applications.
Microservice Architecture is the main reference pattern for this approach.
Here, services should be as small as possible, within reasonable limits.
Creating hundreds of applications exposing only one web service isn’t necessarily a good choice. There aren’t any strict rules for how big or small a service should be.
What matters is loose coupling, high cohesion, and integration complexity.
You need to consider the data ownership when using a Microservice Architecture. The database has to be split to maintain the proper level of isolation and independence. Using a shared database can introduce coupling.
Pros
- Every service is expendable.
- Crashes don’t propagate to the entire system
- Small, independent services can be easier to change
- Reusability across platforms and languages: you can reuse the small services in other systems
- Microservices are equivalent to scaling along the Y-axis of the scale cube (decomposing by service/functionality). And you can combine microservices with the other two dimensions of the scale cube to scale further
Cons
More nodes to manage introduces higher complexity in terms of integration, deployment, and code sharing. But cloud services and modern DevOps methodologies help. So does the Node.js module system.
Integration patterns in a microservice architecture
The API proxy
Also called an API gateway.
It’s a server that proxies the communication between a client and a set of remote APIs.
In a Microservice Architecture, its purpose is to provide a single access point for multiple API endpoints (but can also offer load balancing, caching, auth, and traffic limiting).
It’s essentially a reverse proxy.
API orchestration
Defined by Daniel Jacobson, VP of Engineering for the Netflix API, as:
An API Orchestration Layer (OL) is an abstraction layer that takes generically modeled data elements and/or features and prepares them in a more specific way for a targeted developer or application. (src (opens in a new tab))
Say you have a system of three microservices, Checkout, Cart, and Products. These handle their respective elements of an e-commerce application.
Now, you want a functional store frontend that can interact with those backend services.
Then you set up an API Orchestration Layer. A completeCheckout() function (specific) can then use the generically modeled functionalities from each of these services, like:
checkoutService/pay– pay for the items in your cart, completing the transactioncartService/delete– delete the items from the cart as the payment is successfully processedproductsService/update– update stock status
By using three operations, each from a different service, we have a new API that coordinates the services to maintain the entire system in a consistent state.
Another common operation performed by the API Orchestration Layer is data aggregation: combining data from different services into a single response.
This pattern is easy to design, easy to debug, and easy to scale.
But it has to have a complete knowledge of the underlying architecture and how each service works.
An alternative is the message broker, via the Publish Subscribe Architecture.
Integration with a message broker
This is an implementation of the Observer Pattern.
Say, given the example above where we have Checkout, Cart, and Products services, we can just call the pay operation in the checkoutService, which emits a purchased event.
Both the cartService and productsService listens to this event, and performs some actions based on it.
13. Messaging and Integration Patterns
Now we’ve scaled by distributing systems, so how can we integrate them?
There are two main techniques:
- Using a shared storage as a central coordinator & keeper of all the information
- Use messages to disseminate data, events, and commands across the nodes of the system
This is about using messages.
Book recommendation: Enterprise Integration Patterns by Gregor Hohpe and Bobby Woolf.
Fundamentals of a messaging system
When talking about messages & messaging systems, there are 4 fundamentals elements to consider:
- Direction of communication: one-way or request/reply
- Purpose of the message: determines content
- Timing of message: sent and received in-context (synchronously) or out-of-context (asynchronously)
- Delivery of the message: directly or via broker
Typical one-way communication is e.g. email, webserver sending a message to a connected browser using WebSockets, or a system distributing tasks to workers.
Then there’s the request/reply exchange pattern, where the message in one direction is always matched (except in error conditions) by a message in the opposite direction.
E.g. invocating a web service or sending a query to a database.
It seems trivial, but consider multi-node request/reply communication, or when the communication channel is asynchronous.
There are various types of messages. Generally:
- Command Messages: trigger execution of an action or task on the receiver.
- Has to contain all essential information to run the task
- Can be used to implement remote procedure call (RPC) systems
- RESTful HTTP calls are simple examples of commands. Each HTTP verb has a specific meaning and is associated with a precise operation.
- Event Messages: used to notify another component that something has occurred. Usually contains the type of the event and sometimes also details like context, subject, or actor involved.
- Document Messages: to transfer data between components and machines. Doesn’t contain information about what to do with the data.
With asynchronous communication, we can store messages and deliver than as soon as possible or at a later time. This is useful when the receiver is too busy to handle new messages or when we want to guarantee delivery.
This is possible with a message queue, which mediates the communication between the producer of the message and the consumer, by storing messages before they get delivered.
The queue can be located in the producer, or split between the producer and consumer (in peer-to-peer architectures), or live in a dedicated external system acting as middleware for communication (broker).
We also have the log data structure which has a similar (not the same) goal as the message queue.
A log is an append-only data structure, which is highly durable and whose messages can be read as they arrive or by accessing its history.
In messaging and integration systems, this is known as a data stream.
In a stream, messages are not removed when they are retrieved or processed. This allows consumers to retrieve messages as they arrive or can query the stream at any time to retrieve past messages.
This gives it more freedom when accessing the messages.
And a stream can be shared by more than one consumer.
We can deliver messages directly to the receiver in a peer-to-peer fashion, or through a centralized intermediary system called a message broker.
In p2p, every node is directly responsible for the delivery of the message to the receiver. So nodes have to know the address and port of the receiver & they have to agree on a protocol and message format.
The broker decouples the receiver from the sender. They don’t have to agree; each node is independent. Brokers can also offer additional features like persistent queues, routing, message transformations, and monitoring. And support a broad range of messaging patterns.
But the broker is also a single point of failure. It has to be scaled to match requirements. And exchanging messages without it can reduce latency.
Publish/Subscribe pattern
Basically a distributed Observer Pattern.
Can be either peer-to-peer or with a broker.
Redis can be used as a message broker, but its capabilities in that area are very simple and basic, especially compared to more advanced message-oriented middleware.
Simple WebSocket example with Redis as a broker:
// index.js
import WebSocket, { WebSocketServer } from "ws";
import { createServer } from "node:http";
import staticHandler from "serve-handler";
import { Redis } from "ioredis";

const redisSub = new Redis();
const redisPub = new Redis();

const server = createServer((req, res) => {
	return staticHandler(req, res, { public: "www" });
});

const wss = new WebSocketServer({ server });
wss.on("connection", (client) => {
	console.log("Client connected");
	client.on("message", (msg) => {
		console.log(`Message: ${msg}`);
		redisPub.publish("chat_messages", msg);
	});
});

redisSub.subscribe("chat_messages");
redisSub.on("message", (channel, msg) => {
	for (const client of wss.clients) {
		if (client.readyState === WebSocket.OPEN) {
			client.send(msg);
		}
	}
});

server.listen(process.argv[2] || 8080);
<!-- index.html -->
<!DOCTYPE html>
<html>
<body>
Messages:
<div id="messages"></div>
<form id="msgForm">
<input type="text" placeholder="Send a message" id="msgBox" />
<input type="submit" value="Send" />
</form>
<script>
const ws = new WebSocket(
`ws://${window.document.location.host}`
)
ws.onmessage = function (message) {
const msgDiv = document.createElement('div')
msgDiv.innerHTML = message.data
document.getElementById('messages').appendChild(msgDiv)
}
const form = document.getElementById('msgForm')
form.addEventListener('submit', (event) => {
event.preventDefault()
const message = document.getElementById('msgBox').value
ws.send(message)
document.getElementById('msgBox').value = ''
})
</script>
</body>
</html>Reliable message delivery with queues
With message queues, the sender and receiver(s) don’t necessarily need to be active and connected at the same time to establish a communication. The queue system can store messages until the destination can receive them.
This is opposed to the fire-and-forget paradigm, wherein a subscriber can receive messages only when they’re connected to the messaging system.
A subscriber that can always reliably receive all the messages, even those sent when it’s not listening for them, is called a durable subscriber.
We have a durable subscriber when the messaging system can achieve “at least once” or “exactly once.” And for that, it needs a message queue.
Delivery semantic of a messaging system in three categories:
- At most once, or, fire-and-forget: message is not persisted & delivery is not acknowledged
- At least once: message is guaranteed to be received at least once, but duplicates can occur
- Exactly once: this is the most reliable delivery semantic. It guarantees that the message is received once and only once. Comes at the expense of a slower and more data-intensive mechanism for acknowledging the delivery of messages
We have open protocols for message queues, like AMQP, STOMP, and MQTT.
AMQP (RabbitMQ uses this) is an open standard protocol supported by many message-queuing systems.
There are three essential components in AMQP:
- Queue: the data structure responsible for storing the message consumed by the clients.
- Messages are pushed (or pulled) to one or more consumers
- If multiple consumers are attached to the same queue, messages are load balanced across them
- A queue can be one of:
- Durable: it’s automatically recreated if the broker restarts. Durable doesn’t imply contents are preserved—only messages marked as persistent are saved to the disk & restored in case of a restart
- Exclusive: it’s bound to only one particular subscriber connection. When the connection is closed, the queue is destroyed
- Auto-delete: deleted when the last subscriber disconnects
- Exchange: where a message is published. An exchange routes the messages to one or more queues depending on the algorithm it implements
- Direct exchange: routes by matching an entire routing key (e.g.
chat.msg) - Topic exchange: distributes the messages using a glob-like pattern matched against the routing key (e.g.
chat.#matches all routing keys starting withchat.) - Fanout exchange: broadcasts a message to all connected queues, ignoring any routing key provided
- Direct exchange: routes by matching an entire routing key (e.g.
- Binding: the link between exchanges and queues. Also defines the routing key or pattern used to filter the messages that arrive from the exchange
These are managed by a broker. When connecting to a broker, a client creates a channel (abstraction of a connection) which is responsible for maintaining the state of the communication with the broker.
Reliable messaging with streams
The alternative to queues are streams.
A stream (or log) is an ordered, append-only, durable data structure.
Messages (would be more appropriately called records in the context of streams) are always appended to the stream and are not automatically deleted when consumed.
And a stream can be queried to retrieve a batch of past records / get replayed starting from a specific record.
And importantly, records are pulled by the consumer from the stream. This allows the consumer to process the records at its own pace without risking overwhelm.
When to use streams over message queues?
An obvious use case is processing sequential data (streaming data) that may also require the consumer to process messages in batch or to look for correlations in past messages.
Both message queues and streams can do simple publish/subscribe patterns, even with reliable message delivery. But message queues are better for complex system integration tasks, as they provide advanced routing & allow us to have different priorities for different messages.
Apache Kafka and Amazon Kinesis are popular streaming platforms. Redis also works for simpler tasks, using Redis Streams.
Here’s an example of using Redis Streams for a chat application. The frontend was written earlier in this note.
import WebSocket, { WebSocketServer } from "ws";
import { createServer } from "node:http";
import staticHandler from "serve-handler";
import { Redis } from "ioredis";

// Initialize Redis clients for general use and reading from streams
const redisClient = new Redis();
const redisClientXRead = new Redis();

// Create an HTTP server to serve static files from the 'www' directory
const server = createServer((req, res) => {
	return staticHandler(req, res, { public: "www" });
});

// Initialize a WebSocket server attached to the HTTP server
const wss = new WebSocketServer({ server });

// Event handler for new WebSocket connections
wss.on("connection", async (client) => {
	console.log("Client connected");

	// Listen for incoming messages from the connected client
	client.on("message", (msg) => {
		console.log(`Message: ${msg}`);
		// Add the received message to the Redis stream 'chat_stream' with an auto-generated ID ('*' means Redis will generate a unique ID)
		// Follows a lsit of key-value pairs, which is `message:msg` here
		redisClient.xadd("chat_stream", "*", "message", msg);
	});

	// Retrieve all messages from the 'chat_stream' Redis stream by specifying the range from '-' to '+', which means from the beginning to the end of the stream
	const logs = await redisClient.xrange("chat_stream", "-", "+");

	// Send each retrieved message to the newly connected client
	for (const [, [, message]] of logs) {
		client.send(message);
	}
});

// Function to broadcast a message to all connected WebSocket clients
function broadcast(msg) {
	for (const client of wss.clients) {
		// Ensure the client connection is open before sending the message
		if (client.readyState === WebSocket.OPEN) {
			client.send(msg);
		}
	}
}

// Variable to keep track of the last processed record ID in the Redis stream
let lastRecordId = "$";

// Asynchronous function to continuously process new messages from the Redis stream
async function processStreamMessages() {
	while (true) {
		// Block and wait for new messages in the 'chat_stream' starting after 'lastRecordId'
		const [[, records]] = await redisClientXRead.xread(
			"BLOCK",
			"0", // timeout after which the command returns a `null` result - `0` means we wait forever
			"STREAMS",
			"chat_stream",
			lastRecordId,
		);

		// Iterate through each new record received from the stream
		for (const [recordId, [, message]] of records) {
			console.log(`Message from stream: ${message}`);
			// Broadcast the new message to all connected clients
			broadcast(message);
			// Update 'lastRecordId' to the current record's ID to avoid reprocessing
			lastRecordId = recordId;
		}
	}
}

// Start processing stream messages and log any errors that occur
processStreamMessages().catch((err) => console.error(err));

// Start the HTTP server on the specified port or default to 8080 if none is provided
server.listen(process.argv[2] || 8080);
Task distribution patterns
Chapter 11 showed how to delegate CPU-bound tasks to local processes. But how can we scale beyond a single machine?
We can use a messaging pattern that allows us to spread tasks across multiple machines. These tasks could be individual chunks of work or pieces of a bigger task split using a Divide and Conquer approach.
We essentially want a message distribution pattern similar to a load balancer that dispatches each message to a different worker. This pattern is called competing consumers, fanout distribution, or ventilator in messaging systems terminology.
But here it’s the workers that connect to the task producer or to the task queue to receive new jobs. This is great in a scalable system as we can easily increase the number of workers without modifying the producer or using a service registry.
And we don’t necessarily need request/reply communication between the producer and workers. Usually it’s just one-way asynchronous communication.
In this kind of architecture, messages can potentially always travel in one direction, creating pipelines. Messages may be distributed across a set of workers (fanout), forwarded to other processing units, and then aggregated into a single node (fanin), usually called the sink.
Request/Reply patterns
- Request/reply abstractions can be built on top of one-way channels using specific patterns
- The Correlation Identifier pattern is a fundamental approach for request/reply over one-way channels
- Key elements of the Correlation Identifier pattern:
- Each request is marked with a unique identifier
- The receiver attaches this identifier to the response
- The sender uses the identifier to match responses with the corresponding requests
- This pattern solves the problem of message correlation in asynchronous one-way channels
- It allows messages to travel in any direction at any time while maintaining proper matching
- The pattern works even when responses are received in a different order than the requests were sent
- Correlation Identifier is a basic pattern for request/reply communication over one-way channels. This pattern alone is insufficient in more complex messaging architectures
- Challenges arise when there are multiple channels, queues, or requestors
- In such cases, a return address is needed in addition to the correlation ID
- The return address allows the replier to send the response back to the original sender