AI Assistant for Obsidian
What if you could take all of your existing workflows in Obsidian, and in just a few steps, add the power of AI?
Imagine…
- Creating a new note and having AI curate writing prompts, based on links you’ve already made, so you never start from a blank page
- Using AI as an intellectual sparring partner as you write your notes
- Effortlessly transforming the structure of your writing by giving instructions in plain English
All this, and so much more, is now possible from within Obsidian.
The new AI Assistant for QuickAdd is a powerful tool that integrates with OpenAI’s GPT-3 and GPT-4 models to provide a powerful AI assistant inside your thinking environment.
It allows you to automate the trivial, freeing up time for the important, and augment your thinking by acting as an intellectual sparring partner.
All you need is the QuickAdd plugin and an OpenAI API key (opens in a new tab). Here’s TfTHacker’s wonderful guide to acquiring such an API key (opens in a new tab).
Here’s a Twitter thread with some examples of what you can do with the AI Assistant (opens in a new tab). I’ll showcase all of these examples in this guide.
From 0 to AI-Powered
- Inside Obsidian, create a folder for AI prompt templates. Remember the path to this folder, you’ll need it later. E.g.
bins/ai_prompts. - Open QuickAdd settings. Open the “AI Assistant” settings, and set the path to your AI prompt templates folder.
- In the same settings tab, paste your OpenAI API key into the “OpenAI API Key” field.
That’s really it. You’re now ready to use the AI Assistant.
The basic idea is that you set up a QuickAdd Macro, which will trigger the AI Assistant.
The AI Assistant will then use the prompt template you specify to generate a prompt, which it will then send to OpenAI.
OpenAI will then return a response, which the AI Assistant passes on to the QuickAdd Macro.
You can then use the response in subsequent steps in the macro, e.g. to capture to a note, or create a new note.
Creating prompt templates is simple: just create a note in your prompt templates folder.
You can use any of QuickAdds Format Syntax (opens in a new tab) or QuickAdd Inline Scripts (opens in a new tab). You’ll see some powerful examples of this in the My Workflows section.
Here’s a very simple setup example, going from 0 to AI-powered in just a few steps.
I have a folder for AI prompt templates, as recommended.
My basic AI Assistant macro setup uses just the AI Assistant followed by a Capture, as shown in the GIF above.
The only difference is that my Capture uses the following Capture format:
{{selected}}

{{value:output}}
{{selected}} is either empty or whatever text you’ve selected, making it ideal for using AI in the active file.
{{value:output}} is the assistant’s output.
But the AI Assistant can be used as a building block in more elaborate macros, as we shall see.
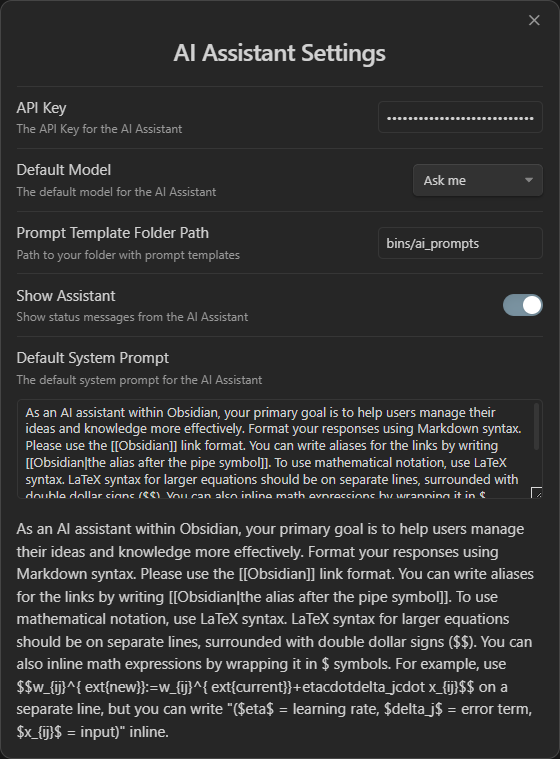
The AI Assistant Settings
In the main settings for the AI Assistant, accessed through the QuickAdd settings, you can set the following options:
- API Key for OpenAI
- Prompt Templates Folder, which contains all of your prompt templates
- Default model, which determines which model OpenAI will use
- Whether to show the assistant, which toggles status messages
- Default system prompt template, which will determine the models behavior
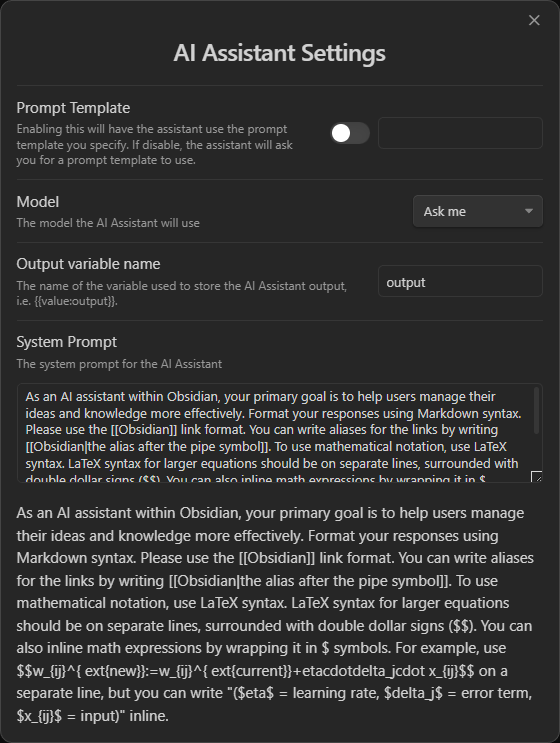
And then, for each individual AI Assistant command in your macros, you can set the following options:
- Prompt template, which determines which prompt template to use. If you do not specify one, the AI Assistant will ask you to select one from your prompt templates folder.
- Model, which determines which model OpenAI will use. This will override the default model set in the main settings.
- Output name variable, which determines the name of the variable that will contain the AI Assistant’s output. This is useful if you want to use the output in subsequent steps in your macro. This is
output, i.e.{{value:output}}, by default. There will also be a{{value:output-quoted}}variable, which will contain the output, but with in markdown blockquote format. This is useful if you want to use the output in a callout, for example. - System prompt template, which determines the models behavior. This will override the default system prompt template set in the main settings.
My AI-Powered Workflows
What follows are select workflows I’ve found to be useful in my work.
I’m including the prompt template as a whole, so you can copy and paste it into your own AI prompt templates folder.
There is some scripting involved in some of these, but I’ve tried to annotate the code so it’s easy to understand what you are running.
Generating writing prompts
Enter a link and AI generates 10 writing prompts based on your notes connecting to that note.
This prompt template uses Dataview (required plugin) to get all notes related to the one you enter.
Here is a list of Obsidian (Markdown) links to pages related to {{value:Link}}.
Please use these to give me 10 writing prompts in bullet form concerning {{value:Link}}.

Use the links in paragraps as part of the sentences.

```js quickadd
// Use a shorthand for the DataView API
const dv = DataviewAPI;
// Prompt user for link to MOC note
const targetLink = await this.quickAddApi.inputPrompt(
    'MoC Link',
    "Enter a link we'll use to get all notes linked to it."
);
this.variables['Link'] = targetLink;

// Get a list of all notes linked to the target link
const healthPages = dv.pages(targetLink).values;
// Format the notes as [[links]]
const links = healthPages.map((f) => {
    const tf = app.vault.getAbstractFileByPath(f.file.path);
    return app.fileManager.generateMarkdownLink(tf, '/');
});

// Join the list such that it is in text format, and there is one link per line
return links.join('\n');
```
MOC Creator
Here’s the MOC outline creator I showcased in the Twitter thread (opens in a new tab).
This is an improved version which, like the above prompt, asks you for a link, and then it generated a MOC for that note.
Here is a list of Obsidian (Markdown) links to pages related to {{value:Link}}.
Please use these to write the outline for a note concerning {{value:Link}}. It should be at most 200 words.

Use the markdown links in paragraps as part of the sentences.

```js quickadd
// Use a shorthand for the DataView API
const dv = DataviewAPI;
// Prompt user for link to MOC note
const targetLink = await this.quickAddApi.inputPrompt(
    'MoC Link',
    "Enter a link we'll use to get all notes linked to it."
);
this.variables['Link'] = targetLink;

// Get a list of all notes linked to the target link
const healthPages = dv.pages(targetLink).values;
// Format the notes as [[links]]
const links = healthPages.map((f) => {
    const tf = app.vault.getAbstractFileByPath(f.file.path);
    return app.fileManager.generateMarkdownLink(tf, '/');
});

// Join the list such that it is in text format, and there is one link per line
return links.join('\n');
```
MOC Creator with content
This is a variation of the MOC creator, which also includes the content of the note you are creating a MOC for.
Here is a list of Obsidian (Markdown) links to pages related to {{value:Link}} along with their contents.
Please use these to write the outline for a note concerning {{value:Link}}. It should be at most 200 words.

Use the markdown links in paragraps as part of the sentences.

```js quickadd
// Use a shorthand for the DataView API
const dv = DataviewAPI;
// Prompt user for link to MOC note
const targetLink = await this.quickAddApi.inputPrompt("MoC Link", "Enter a link we'll use to get all notes linked to it.");
this.variables["Link"] = targetLink;

// Get a list of all notes linked to the target link
const healthPages = dv.pages(targetLink).values;
// Format the notes as [[links]]
const links = await Promise.all(healthPages.map(async f => {
	const tf = app.vault.getAbstractFileByPath(f.file.path);
	const fileContent = await app.vault.cachedRead(tf);
	const link = app.fileManager.generateMarkdownLink(tf, '/');

	return `## ${link}\n${fileContent}`
}));

// Join the list such that it is in text format, and there is one link per line
return links.join("\n");
```
Summarizer
Here’s a simple prompt where you select some text, and then use the assistant with that prompt.
Then it’ll spit out an AI-generated summary:
Please summarize the following text. Use only the text itself as material for summarization, and do not add anything new. Rewrite this for brevity, in outline form:
{{value}}
Transform selected
This prompt template will ask you for instructions, which it’ll use to transform the text you’ve selected.
It can do basically anything - not just transform. You could ask it to summarize text by giving instructions similar to those in the summarizer prompt, explain the text you’ve selected, rewrite something in outline form, or anything you’d like.
I asked it to explain a LaTeX equation I had selected by using the symbols as reference, and it did so perfectly, explaining each symbol, and then the whole formula.
Instructions:
{{VALUE:Instructions}}

Please follow the instructions above to transform the text:
{{selected}}
Flashcard creator
This prompt template generates flashcards based on selected text.
Please create flashcards in the form
Q: Question here
A: Answer here

The question should be brief, to the point, simple, and should not be double-barreled. Avoid general questions and double negative questions.
The answer should also be brief and simple.

If you cannot contain the material in a single question, please create multiple flashcards.

---

{{value}}
Get me started writing about…
To get your writing kickstarted:
I'm writing about {{value:Topic}}.

Please give me some points to get started:

-   What are the adjacent topics?
-   What are the basics of the topic?
-   Why was the "{{value:Topic}}" topic created?
-   What problems does it solve?
Manual prompt
I consider this almost essential.
It’s similar to just opening ChatGPT and prompting it.
The template will ask you for some input, which is the entire prompt.
{{value}}It’s also the one I demonstrated in the simple setup example.
Alternative viewpoints
This one helps me a lot when I’m stuck.
It’s nice to get another perspective on things.
You’ll want to select some text (your draft) and then enter a topic when prompted.
I'm writing about {{value:Topic}}. Here's my draft:

{{value}}

Please suggest 3 improvements, 3 alternative viewpoints, and 3 questions for further reflection.
Prompt Chaining
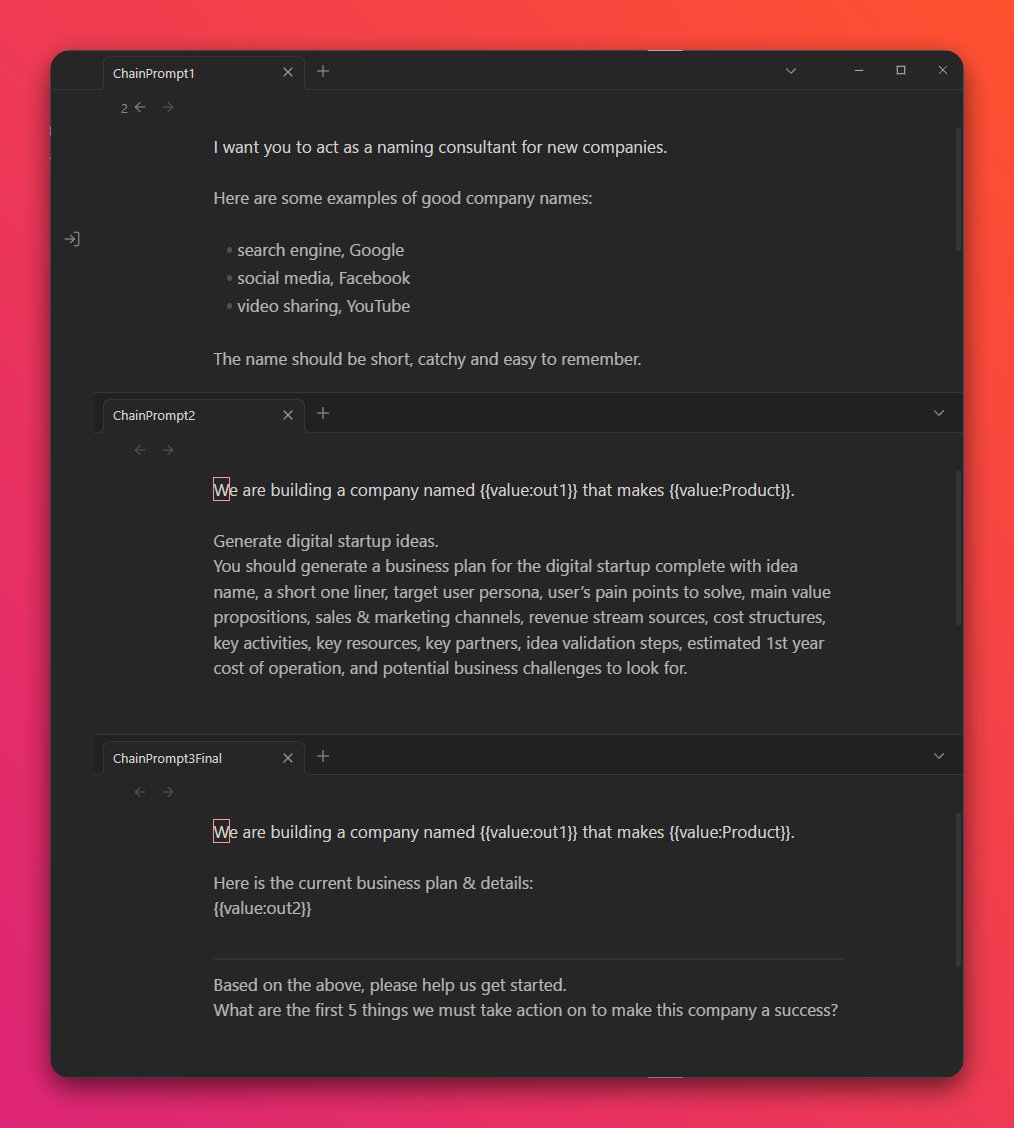
Okay, let’s get to some more advanced stuff.
Prompt chaining is where a prompt uses the output of a previous prompt.
Essentially, you’re making the AI think in steps - like following a recipe.
Like I mentioned earlier, the AI Assistant can be viewed as a building block.
You can stack them together to get powerful results.
Here’s a stack of three prompts, each one using the results of the previous one.

And when you configure each one to have specific settings, you can have it completely automated:
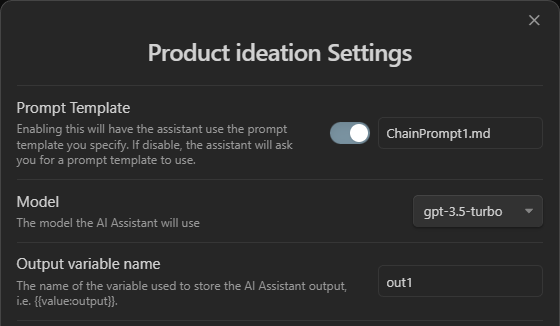
For example, this is the first step.
It uses the ChainPrompt1 template and outputs its value in {{value:out1}}.
And since this is a macro, each output variable can be used in subsequent steps.
By stacking the assistant a bunch of times and using templates that each consume the output variable of the previous step, we get chain prompting.
The final capture has a capture format like this one:
## Iteration 1

{{value:out1}}

## Iteration 2

{{value:out2}}

## Output

{{value:out_final}}
Summarize book notes
This was one of the first workflows I built with the AI Assistant.
Here is my previous workflow for importing book notes into Obsidian:
- Get highlights from Readwise
- Create note in vault
New, AI-powered workflow:
- Get highlights from Readwise
- AI Assistant summarizes book based on highlights
- Create note in vault with summary
The core workflow is really the same. I just pick a book, and it gets imported, so my input hasn’t changed.
You can get this workflow, too!
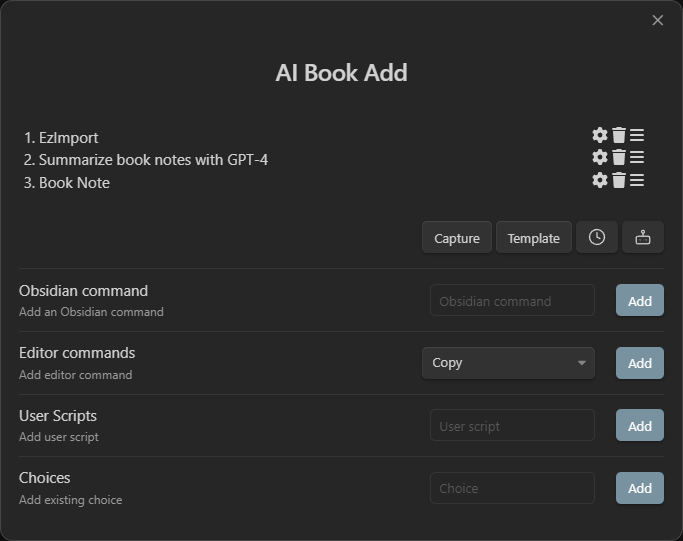
Here is the macro we need to set up:
The first and last steps both come from my How I Import Literature Notes into Obsidian (opens in a new tab) blog post.
If you have followed it previously, you’ll need to do so again, as I’ve recently updated the script and instructions for a more powerful workflow (prior to making the AI assistant).
The middle step is the AI Assistant.
You will need to set it to use the GPT-4 model for greater context size. I’ve found GPT-3.5 to be too limited for this task.
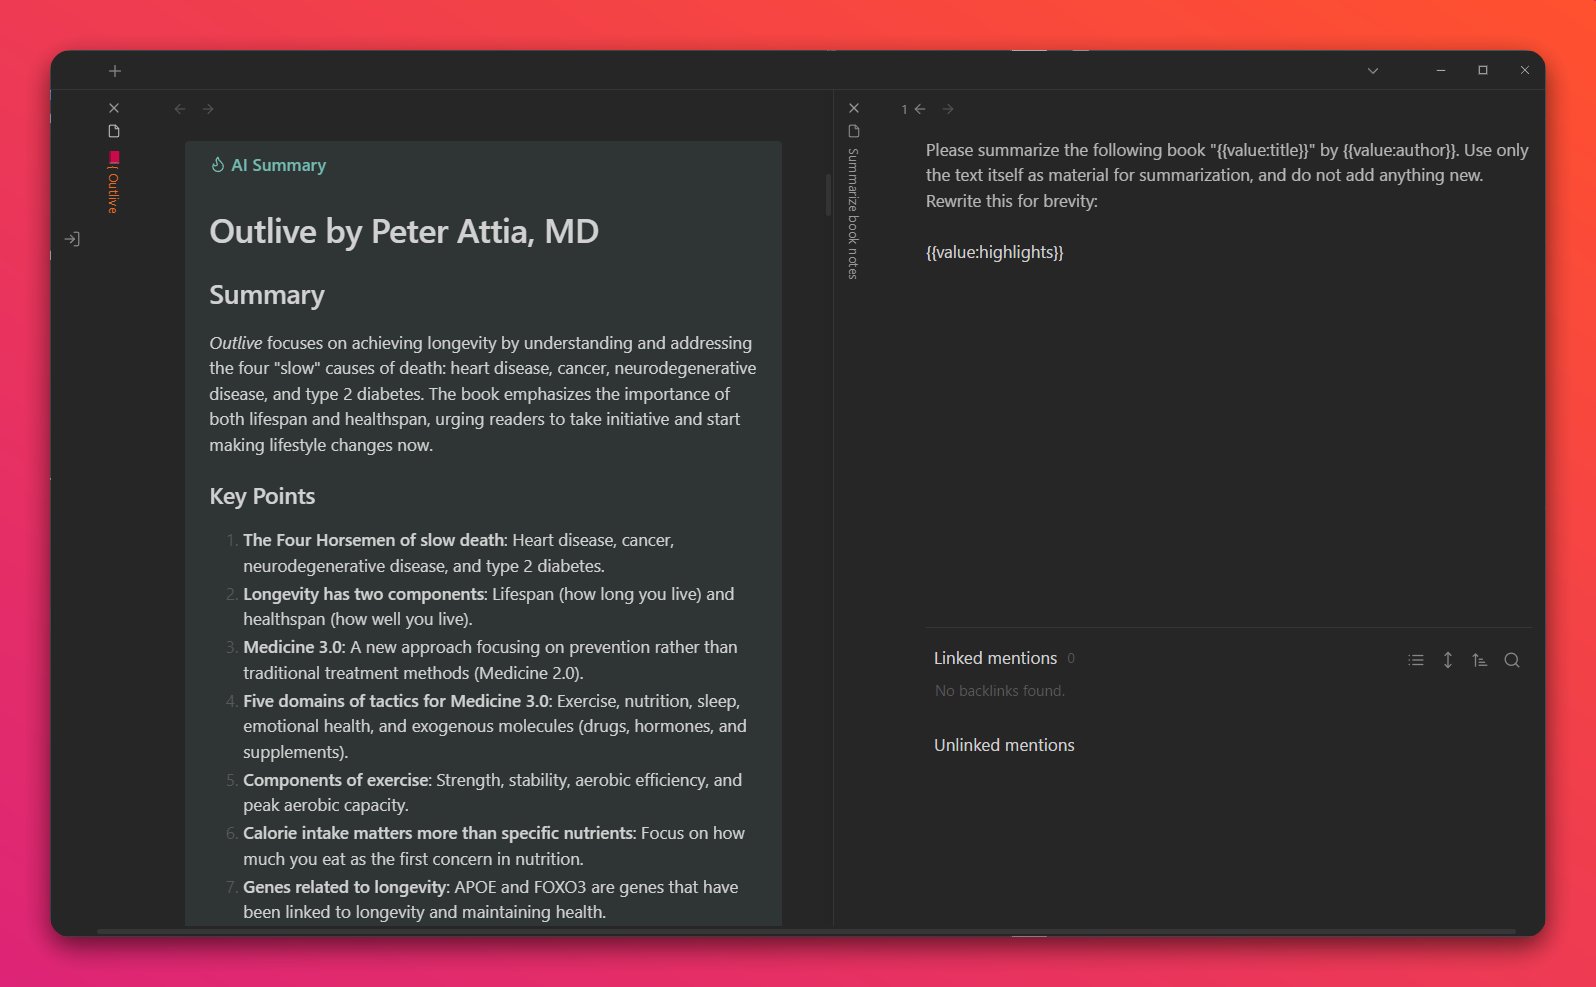
Then you need to configure the AI Assistant to use a specific template, which I’ve called Summarize book notes.
Here is the template:
Please summarize the following book "{{value:title}}" by {{value:author}}. Use only the text itself as material for summarization, and do not add anything new. Rewrite this for brevity:

{{value:highlights}}
Each of these values come from the EzImport script, which is why the ordering of the macro has to be EzImport → AI Assistant → Capture.
So, start by following the guide (opens in a new tab). Inject the AI Assistant in the middle of that workflow with the settings shown above… and that’s it.
Beyond the summary, you can add an additional step to the macro to create actionable takeaways. Use the template below for that.
Finally, here is my book note template, which I use for all my book notes. The non-AI version is found in the aforementioned guide:
---
image:
tags: in/books state/process
aliases:
  - "{{VALUE:title}}"
cssclass:
lastHighlightAt: {{VALUE:lastHighlightAt}}
shouldPublish: true
---

# {{VALUE:title}}

## Metadata
Tags:: {{VALUE:tags}}
Type:: [[{]]
Author:: {{VALUE:author}}
Reference::
Rating:: {{VALUE:10,9,8,7,6,5,4,3,2,1,0}}
Reviewed Date:: ==UPDATE THIS==
Finished Year:: [[{{DATE:gggg}}]]

# Thoughts

# Actions Taken / Changes
> [!todo] Actionable Takeaways - AI
{{value:actionable-takeaways-quoted}}

# Summary of Key Points
> [!tip] AI Summary
{{value:summary-quoted}}

# Highlights & Notes
Actionable takeaways
Create actionable takeaways based on the text you give. This takes a summary variable, which you can get from the previous step in the macro (using the Summarize book notes workflow, for example).
Write actionable takeaways based on the following text. Write a step-by-step plan. Start by giving me something I can take action on immediately, and then tell me what other things I can do, based on the text. Use the 80/20 principle to prioritize the most important first.

{{value:summary}}
YouTube Summarizer
This prompt template will allow you to grab the transcript of a YouTube video, and then summarize it.
All you need to provide is the YouTube video URL when you want to create a new note.
I couple this with the Actionable takeaways prompt template to create a note with a summary and actionable takeaways.
Therefore, my macro looks like this:
- YouTube Summarizer - AI Assistant step grabs the transcript & summarizes it. It also sets up a few variables for the next steps.
- Actionable takeaways - AI Assistant step creates actionable takeaways based on the summary.
- Create note - Creates a new note with the title of the video, and the summary + actionable takeaways.
The third step - creating a new note - is a Template action which creates a new note with the file name + {{VALUE:safeTitle}}. The safeTitle comes from the first step of the macro, and represents the title of the video, but with all illegal characters removed.
The limit for GPT-4 on the YT Summarizer seems to be ~20 min video length.
Please summarize the following text. Use only the text itself as material for summarization, and do not add anything new. Rewrite this for brevity, in outline form:
```js quickadd
const videoUrl = await this.quickAddApi.inputPrompt("Video URL");
const url = new URL(videoUrl);
const videoId = url.searchParams.get('v');
this.variables["📺 YouTube Video ID"] = videoId;
const transcriptBody = await requestUrl(`https://youtubetranscript.com/?server_vid2=${videoId}`).text;
const videoPage = await requestUrl(videoUrl).text;
console.log(transcriptBody);
console.log(videoPage);
const dp = new DOMParser();
const dom = dp.parseFromString(transcriptBody, 'text/xml');
const transcriptEl = dom.getElementsByTagName('transcript')[0];
if (!transcriptEl) {
new Notice("No transcript found.");
throw new Error("No transcript found.")
}
const textElements = transcriptEl.getElementsByTagName('text');
const textArr = [];
for (let i = 0; i < textElements.length; i++) {
const text = textElements[i];
textArr.push(text.textContent);
}
const transcript = textArr.join("\n");
const title = videoPage.split('<title>')[1].split('</title>')[0].replace(" - YouTube", '').trim();
function sanitizeFileName(fileName) {
const illegalChars = /[\/\?<>\\:\*\|"]/g;
const undesiredChars = /"/g;
const replacementChar = '_';
return fileName.replace(illegalChars, replacementChar).replace(undesiredChars, "");
}
function sanitizeTitle(text) {
const undesiredChars = /"/g;
const replacementChar = "";
return text.replace(undesiredChars, replacementChar);
}
this.variables["title"] = sanitizeTitle(title);
this.variables["safeTitle"] = sanitizeFileName(title);
return transcript;
```Here is my YouTube video note template:
---
tags: in/video state/process
aliases:
  - "+ {{VALUE:title}}"
cssclass: null
image: https://i.ytimg.com/vi/{{VALUE:📺 YouTube Video ID}}/hqdefault.jpg
---

Title:: {{VALUE:title}}
Type:: [[+]]
Tags::
URL:: https://www.youtube.com/watch?v={{VALUE:📺 YouTube Video ID}}
Channel::
Rating:: {{VALUE:10,9,8,7,6,5,4,3,2,1,0}}
Reference::
Publish Date::
Reviewed Date:: ==UPDATE THIS==

---

<center><iframe width="560" height="315" src="https://www.youtube.com/embed/{{VALUE:📺 YouTube Video ID}}" frameborder="0" allow="accelerometer; autoplay; encrypted-media; gyroscope; picture-in-picture" allowfullscreen></iframe></center>

---
> [!info] AI Summary
{{value:summary-quoted}}

> [!todo] Actionable Takeaways
{{value:actionable-takeaways-quoted}}

<% tp.file.cursor(0) %>
Website Summarizer
This prompt template will allow you to grab the text of a website, and then summarize it.
Summarize the content of this website:

---

```js quickadd
async function fetchAndExtractText(url) {
  try {
    const htmlContent = await request(url);

    // Create a DOM parser to parse the HTML content
    const parser = new DOMParser();
    const doc = parser.parseFromString(htmlContent, 'text/html');

    // Remove script tags
    const scriptTags = doc.querySelectorAll('script, style, noscript');
    scriptTags.forEach(tag => tag.remove());

    // Extract and return the textual content
    return doc.body.innerText || doc.body.textContent || "";
  } catch (error) {
    console.error('Error fetching or parsing the page:', error);
    return null;
  }
}

const site = await this.quickAddApi.inputPrompt("Website URL");
return await fetchAndExtractText(site)
```
Final words
This is still the early stages.
I have so many ideas for workflows, prompts, and other cool things we can do with this AI Assistant.
If you have any questions, please let me know.
All my prompt templates can also be found on the same page the AI Assistant is.
I’d love to see how you are using AI in your vault. Feel free to @ me on Twitter.
Please remember that using your API has monetary costs.
GPT-3.5 is rather inexpensive, but GPT-4 can get costly if used excessively.
I strongly encourage you to set a spending limit on your OpenAI account for this very reason.
Try to play around with the models to see what works for you.
This tool (and AI in general) is a major productivity multiplier.
It should never replace your thinking, only augment it.
Let it handle the trivial parts of PKM, so you can focus on what’s important.